How to Make a Swift Video Editor?
Apple’s native stack makes creating a video editor a doable task even for a junior iOS developer with a valid action plan and the right bricks to build it with.
In this article, we will:
- discuss the fundamental components for building a Swift video editor;
- review 4 must-have features of an iOS video editing tool;
- compare SwiftUI vs. UIKit for the editor UI;
- analyze 6 use cases of using a Swift video editor in iOS apps, including social media, photo and video apps, etc.;
- provide you with instructions and sample code to build a Swift video editor from scratch.
Additionally, we will review a faster integration alternative—adding a third-party Swift video editing SDK—to cut the engineering time from weeks or even months to one day and enhance the feature set beyond the basic minimum.
Fasten your seatbelts and let’s dive into developing a feature that can boost user engagement, session time, and organic users.
TL;DR
- Key components for building a Swift video editor include 9 elements;
- In the SwiftUI vs. UIKit battle, the hybrid approach prevails;
- Follow the 8 steps below to create a basic Swift video editor for beginners;
- Banuba Video Editor SDK is a ready-made TikTok-like video editor that you can quickly integrate;
- You can install it using CocoaPods or Swift Package Manager;
- Video Editor SDK can save up to 50% of the development time.
Key Components to Build a Swift Video Editor
Imagine a video editor as a staircase, where each floor is an action that brings you closer to the desired result, an exported video.
- load media;
- build a timeline;
- add visual effects and audio;
- preview;
- export.
For each step, you’ll need a native component to work with. Let’s break them down.
AVFoundation
AVFoundation is basically a media engine and Apple’s framework for interacting with time-based video and audio files. You use it to load files, read tracks, assemble an editable timeline, preview the result, and hand everything off to export.
Its main pieces include:
- AVAsset (file);
- AVAssetTrack (video/audio track);
- AVMutableComposition (editable timeline);
- AVVideoComposition (frame rules/effects/transform);
- AVAssetExportSession (exporter).
Apple’s official documentation is available here.
AVMutableComposition
AVMutableComposition is an editable timeline where you can cut and stitch, trim clips to ranges, place them at exact timestamps, and merge multiple video and audio elements into a single clip.
Use the addMutableTrack(...) to create video/audio tracks you control. You can read more here.
AVVideoComposition
AVVideoComposition is a set of time-based instructions that tell AVFoundation which pixels to render and how to combine tracks at each moment of playback. You can use it to crop, rotate, layer tracks, and apply transitions and effects.
Video transitions and filters can be instruction-based (AVMutableVideoCompositionInstruction) and filter-based (AVVideoComposition(asset: applyingCIFiltersWithHandler:).
How to use it in practice: place clip B so it overlaps the end of clip A; create an AVMutableVideoCompositionInstruction for the overlap; on two AVMutableVideoCompositionLayerInstructions, set opacity A: 1→0 and B: 0→1 across that range.
Read more here.
AVPlayer & AVPlayerViewController
AVPlayer is the bare playback engine with no UI. You pair it with AVPlayerLayer (or your own SwiftUI/UIKit controls) to build a fully custom player/timeline, overlays, gestures, and branded controls.
AVPlayerViewController is a ready-made screen that hosts an AVPlayer and gives you Apple’s standard transport UI plus captions, Picture-in-Picture, AirPlay, and accessibility.
Clearly, sticking to AVPlayerViewController is a faster approach when you can sacrifice the complex UI. Many teams prototype with AVPlayerViewController and switch to a custom AVPlayer-based UI as requirements grow. Learn more here.
Timeline UI (UISlider or a Custom View)
UISlider is Apple’s standard control for selecting a value in a continuous range. In a video editor, you bind it to the media duration and use it to scrub playback—convert the slider’s value to CMTime, call seek, and keep it in sync with a periodic time observer once the item is readyToPlay (as Apple’s docs recommend).
For a richer timeline, use a custom view (commonly a horizontal UICollectionView) that draws evenly spaced thumbnails from AVAssetImageGenerator, overlays a fixed playhead, and provides draggable in/out handles for trimming.
Together, these patterns make the timeline visible and touchable. Users see where they are in the clip, scrub more accurately, snap to keyframe boundaries, and set trims with confidence, dramatically improving UX and usability for long videos.
Core Image & CIFilter
CIFilter is a simple, GPU-accelerated way to apply real-time looks and basic effects to video frames:
- color tweaks (CIColorControls);
- sepia (CISepiaTone);
- blur (CIGaussianBlur);
- vignette (CIVignette), etc.
You have to configure a few parameters and chain filters together (read more here). In a Swift video editor, you attach your CIFilter chain to the rendering path (e.g., via an AVVideoComposition with a Core Image handler) so each frame is processed live during preview and delivered into the final export, all without writing custom Metal shaders.
AVAudioEngine
AVAudioEngine is Apple’s real-time audio toolkit. You build a player node for music or voice, optional effect nodes (EQ, reverb, time/pitch), and a mixer. You then connect them and start the engine.
In a video editor, this lets you preview edits with live audio, mix background music and voiceover, adjust volume, add fades or effects, and hear changes immediately while you edit.
AVAssetExportSession
AVAssetExportSession is the component that saves the preferred file format to the disk.
How to use in practice: create a session with a preset (e.g., AVAssetExportPresetHighestQuality), set outputURL and outputFileType, attach videoComposition/audioMix if used, call exportAsynchronously, and handle status/error.
Metal (optional)
Metal is Apple’s framework that provides access directly to the device’s GPU, allowing the application to render and compute simultaneously. For a basic Swift video editor, Core Image and AVFoundation are enough.
Metal becomes the right choice when you want real-time, low-latency processing that holds 30/60 FPS while users edit, overlay heavy effects, or do things like beautification and AR filters. Final Cut Pro is an excellent example of a tool built using Metal.
In order to use it, you have to build a Metal pipeline (MTL device/command queue/shaders) to render frames in real time, or to accelerate effects beyond what CIFilter provides. You can read more about this framework here.
How to Understand When to Use Metal?
Switch to Metal if your preview drops frames (can’t hold 60 FPS or at least 30 FPS) when users edit or overlay "heavier" effects. Core Image is fine for light filters, Metal is the “turbo” path for low-latency editing.
How can you measure the real-time rendering? Open Xcode, go to Instruments, and then to Metal System Trace. Watch FPS and GPU ms/frame: 60 FPS ≈ 16.7 ms, 30 FPS ≈ 33.3 ms. If numbers go higher, downscale preview while editing or ease effect strength, then restore full quality on play.
Metal Real-time Rendering Examples
When users want to see live skin smoothing simultaneously applied with a film-style color tone, it can be heavy for Core Image. Metal runs both on the GPU in one pipeline, where the smoothing and LUT run simultaneously on each frame and draw to the screen.
In this case, you want to keep GPU time well under 16–17 ms at 60 FPS. If it spikes while editing, temporarily lower the effect strength.
A locked sticker or mask on a moving face in real time is also challenging for Core Image, as you’re compositing multiple layers every frame. Metal blends textures fast without UI lag.
Tech Stack Summary

Key Takeaways
- AVFoundation to load tracks, build timelines, preview, and hand off to export;
- AVMutableComposition, the editable timeline to trim, merge, and place clips at exact times;
- AVVideoComposition, time-based rules for transforms, layering, and transitions;
- AVPlayer/AVPlayerViewController for preview: custom player UI vs. Apple’s built-in controls;
- Timeline UI, UISlider for scrubbing; upgrade to a thumbnail timeline with trim handles;
- Core Image / CIFilter, simple, GPU-accelerated filters (color/blur/sepia) without writing shaders;
- AVAudioEngine for live mixing, effects (music, fades) during editing;
- AVAssetExportSession renders the final .mov/.mp4 with your video/audio settings;
- Metal (optional), low-latency, custom GPU pipelines for heavy, real-time effects.
SwiftUI vs. UIKit: What to Choose?
SwiftUI is Apple’s newer, declarative UI toolkit. You describe what the UI should look like and let the framework handle updates as your data changes. It’s fast to prototype, great for forms, settings, and preview screens, and works on iOS 13 and later.
UIKit is the long-running, imperative toolkit. You manage view controllers and update views step by step. It has a larger, battle-tested set of controls and patterns, and it’s still the most flexible choice for intricate, highly customized widgets (like a thumbnail timeline with drag handles).
In practice, SwiftUI gets you moving quickly for most screens, while UIKit works better for complex, performance-sensitive editing components. You don’t have to choose one. Many teams stick to a hybrid approach—SwiftUI for app chrome and flows, UIKit just for the timeline or other advanced pieces.
SwiftUI vs. UIKit: Comparison Table

Key Takeaways
- SwiftUI is declarative toolkit, great for fast prototyping and standard screens (forms, settings, previews);
- UIKit is a classic imperative toolkit, best for complex, highly customized widgets;
- Most teams use hybrid: SwiftUI for app chrome & simple flows, UIKit just for the advanced timeline.
How to Make a Swift Video Editor from Scratch?
Now, let’s move from theory to practice. We will now review the implementation steps to developing a simple Swift video editor that can:
- open a video clip, trim it, and merge two clips;
add a basic cross-fade transition; - apply a real-time filter (via CIFilter);
- overlay background music with a quick fade-in;
- preview the result in-app and scrub the timeline with a slider;
- export the final video to a file.
We’ll stick to Apple’s native APIs (AVFoundation, Core Image, AVKit) and keep explanations concise. For deeper dives, you can look up each class in Apple Developer Documentation.
Simple Swift Video Editor in 8 Steps
1. Create an iOS app, add AVFoundation, AVKit, and CoreImage.
[code]
import AVFoundation
import AVKit
import CoreImage
[/code]
2. Build an editable timeline (trim). Load your clip as AVAsset, then create an AVMutableComposition and insert a CMTimeRange to trim.
[code]
let asset = AVAsset(url: videoURL)
let comp = AVMutableComposition()
guard let vSrc = asset.tracks(withMediaType: .video).first else { fatalError("No video") }
let vDst = comp.addMutableTrack(withMediaType: .video, preferredTrackID: kCMPersistentTrackID_Invalid)!
let sixSec = CMTime(seconds: 6, preferredTimescale: 600)
try vDst.insertTimeRange(CMTimeRange(start: .zero, duration: sixSec), of: vSrc, at: .zero)
[/code]
3. Merge and add a simple transition. Insert a second clip (another track in the same composition). Overlap the end/start by ~1s and use AVVideoComposition layer instructions to ramp opacity for a cross-fade.
[code]
let asset2 = AVAsset(url: videoURL2)
let vSrc2 = asset2.tracks(withMediaType: .video).first!
let vDst2 = comp.addMutableTrack(withMediaType: .video, preferredTrackID: kCMPersistentTrackID_Invalid)!
// Place 2nd clip right after the 1st, with 1s overlap for dissolve
let overlapDur = CMTime(seconds: 1, preferredTimescale: 600)
let tEndFirst = vDst.timeRange.end
let tStart2 = CMTimeSubtract(tEndFirst, overlapDur)
try vDst2.insertTimeRange(CMTimeRange(start: .zero, duration: asset2.duration),
of: vSrc2, at: tStart2)
// Cross-fade via opacity ramps over the overlap
let instr = AVMutableVideoCompositionInstruction()
instr.timeRange = CMTimeRange(start: tStart2, duration: overlapDur)
let a = AVMutableVideoCompositionLayerInstruction(assetTrack: vDst) // first clip track
let b = AVMutableVideoCompositionLayerInstruction(assetTrack: vDst2) // second clip track
a.setOpacityRamp(fromStartOpacity: 1, toEndOpacity: 0, timeRange: instr.timeRange)
b.setOpacityRamp(fromStartOpacity: 0, toEndOpacity: 1, timeRange: instr.timeRange)
let vcomp = AVMutableVideoComposition()
vcomp.instructions = [instr]; instr.layerInstructions = [a, b]
vcomp.renderSize = vSrc.naturalSize
vcomp.frameDuration = CMTime(value: 1, timescale: 30) // 30 fps
[/code]
4. Apply a real-time filter. Use the Core Image path: AVVideoComposition(asset: applyingCIFiltersWithHandler:) and configure a simple CIFilter (e.g., CIColorControls or CIPhotoEffectNoir).
[code]
let ciContext = CIContext()let noir = CIFilter(name: "CIPhotoEffectNoir")!
let filteredVC = AVVideoComposition(asset: comp) { request in
noir.setValue(request.sourceImage.clampedToExtent(), forKey: kCIInputImageKey)
let out = (noir.outputImage ?? request.sourceImage).cropped(to: request.sourceImage.extent)
request.finish(with: out, context: ciContext)
}
[/code]
5. Add background music with a fade-in. Insert an audio track into the composition and use AVAudioMix + AVAudioMixInputParameters to ramp volume from 0→1 in the first 2 seconds.
[code]
let music = AVAsset(url: musicURL)
if let mTrack = music.tracks(withMediaType: .audio).first {
let aDst = comp.addMutableTrack(withMediaType: .audio, preferredTrackID: kCMPersistentTrackID_Invalid)!
try aDst.insertTimeRange(CMTimeRange(start: .zero, duration: comp.duration), of: mTrack, at: .zero)
let params = AVMutableAudioMixInputParameters(track: aDst)
params.setVolumeRamp(fromStartVolume: 0, toEndVolume: 1,
timeRange: CMTimeRange(start: .zero,
duration: CMTime(seconds: 2, preferredTimescale: 600)))
let audioMix = AVMutableAudioMix(); audioMix.inputParameters = [params]
// keep `audioMix` for preview/export
}
[/code]
6. Preview inside the app. Wrap the composition in an AVPlayerItem, attach your videoComposition/audioMix, play it with AVPlayer (or drop in AVPlayerViewController for built-in UI).
[code]
let item = AVPlayerItem(asset: comp)
// Choose one video composition to preview: instruction-based (vcomp) or CI-filtered (filteredVC)
item.videoComposition = filteredVC /* or: vcomp */
item.audioMix = audioMix
let player = AVPlayer(playerItem: item)
let pvc = AVPlayerViewController(); pvc.player = player
present(pvc, animated: true) { player.play() }
[/code]
7. Show a simple timeline. Bind a UISlider to the player item’s duration so users can scrub; update it with a periodic time observer. (Upgrade later to a thumbnail timeline if needed.)
[code]
// Keep slider in sync while playing
let interval = CMTime(seconds: 0.25, preferredTimescale: 600)
let token = player.addPeriodicTimeObserver(forInterval: interval, queue: .main) { [weak player] t in
guard let item = player?.currentItem else { return }
let dur = item.duration.seconds
guard dur.isFinite, dur > 0 else { return }
slider.value = Float(t.seconds / dur)
}
// Seek when user scrubs
@IBAction func sliderChanged(_ s: UISlider) {
guard let item = player.currentItem else { return }
let dur = item.duration.seconds
guard dur.isFinite, dur > 0 else { return }
let seconds = Double(s.value) * dur
player.seek(to: CMTime(seconds: seconds, preferredTimescale: 600),
toleranceBefore: .positiveInfinity, toleranceAfter: .positiveInfinity)
}
[/code]
8. Export the final video. Create an AVAssetExportSession, choose a preset, set outputURL/outputFileType, attach videoComposition/audioMix, and export asynchronously.
[code]
let outURL = FileManager.default.temporaryDirectory.appendingPathComponent("final.mov")
try? FileManager.default.removeItem(at: outURL)
let session = AVAssetExportSession(asset: comp, presetName: AVAssetExportPresetHighestQuality)!
session.outputURL = outURL
session.outputFileType = .mov
session.videoComposition = filteredVC /* or vcomp */
session.audioMix = audioMix
session.exportAsynchronously {
print("Export:", session.status.rawValue, session.error?.localizedDescription ?? "OK")
}
[/code]
Obviously, a more complex and polished video editor with custom filters, effects, AR, and AI will require way more steps to develop. According to Cleveroad, the time for creating a video editing app starts from 670 hours, and the budget is $33,500 and counting.
Alternatively, you can cut your dev time and cost by replacing a native video editor development with an off-the-shelf video editor SDK integration. The plug-and-play approach with an astonishing feature set and detailed documentation will be a piece of cake to handle even for a junior engineer.
Key Takeaways
- Apple-native only stack features AVFoundation (assets, timeline, export), Core Image/CIFilter (effects), AVKit (preview), and a simple UISlider timeline (upgradeable to thumbnails later);
- The Workflow includes 8 steps: setup → timeline (trim) → merge + transition → filter → audio + fade-in → preview → slider timeline → export.
- A basic prototype is quick; a polished editor (custom timeline, filters, AR/AI) takes weeks–months;
- Skip time- and cost-consuming coding with a ready-to-use video editor SDK to deliver upscale features in days, not months.
What Is Video Editor SDK
AI VE SDK is a full-featured, customizable video editing iOS framework written in Swift or Flutter. It allows your users to easily implement video-making functions like in most popular social apps, i.e. Instagram, TikTok, and Snapchat.
Users can add filters, video effects, music on top of their video, create and animate Stories, change backgrounds in video and then upload or share.
You can use the SDK in your video app if you want to:
- lower the entry threshold for video creation
- engage users with video effects and augmented reality
- generate more user content in your app
- increase session time and content share ratio
- attract new users organically due to shares
Before you integrate a video editor inside your application, you need to understand its features and the user journey.
Key Takeaway
- Video Editor SDK is a prebuilt, customizable iOS video-editing framework;
- It offers filters, effects, music layers, Stories, background replacement, real-time edits, and share/export;
- It helps launch faster with far less engineering; boost UGC, session length, and shares.
3 Steps To Integrate an iOS Video Editor [Swift]
Now we want to guide you through the 3 integration steps taking Banuba's iOS video SDK as an example.
If you prefer a video guide, see the video below.
Note: We offer а 14-day free trial for you to test and assess Video Editor SDK functionality in your app. To receive the trial and token, get in touch with us by filling out a form on our website.
The requirements are as follows:
- Swift 5.9+
- Xcode 15.2+
- iOS 15.0+
1. Integration using CocoaPods
This is the most convenient way to integrate this Swift Video Editor. See the detailed instructions and code samples here.
2. Integration using Swift Package Manager
Alternatively, you can use SPM, if you prefer. See the latest integration guide here.
Customizing the iOS video editor
Now, as you’ve integrated the SDK into your iOS project, you may customize the user interface to fit your app. You can also localize the strings to target different markets.
VE SDK can fully have a unique look and feel, including your branded logos and styles. It’s a way to go for developers and brands who opt for the white label app approach.
With the white label video editor model, you use the ready product, which mimics the best practices in video editing app development. It’s like having some of TikTok and Snapchat but under your brand.
Apart from its obvious pros like time and effort saving, you benefit from the proven user interface structure tested in real apps.
Your product can have the following custom features:
- Icons.
- Colors.
- Text styles like fonts and colors.
- A number of videos with different resolutions and durations, an audio file.
- Video recording duration behavior.
At this stage, you can not change the layout and screen order. The hierarchy of the user interface builds on modules and the dependencies are interconnected.
If you need custom functionality or UX/UI, you can drop us a line to discuss it.
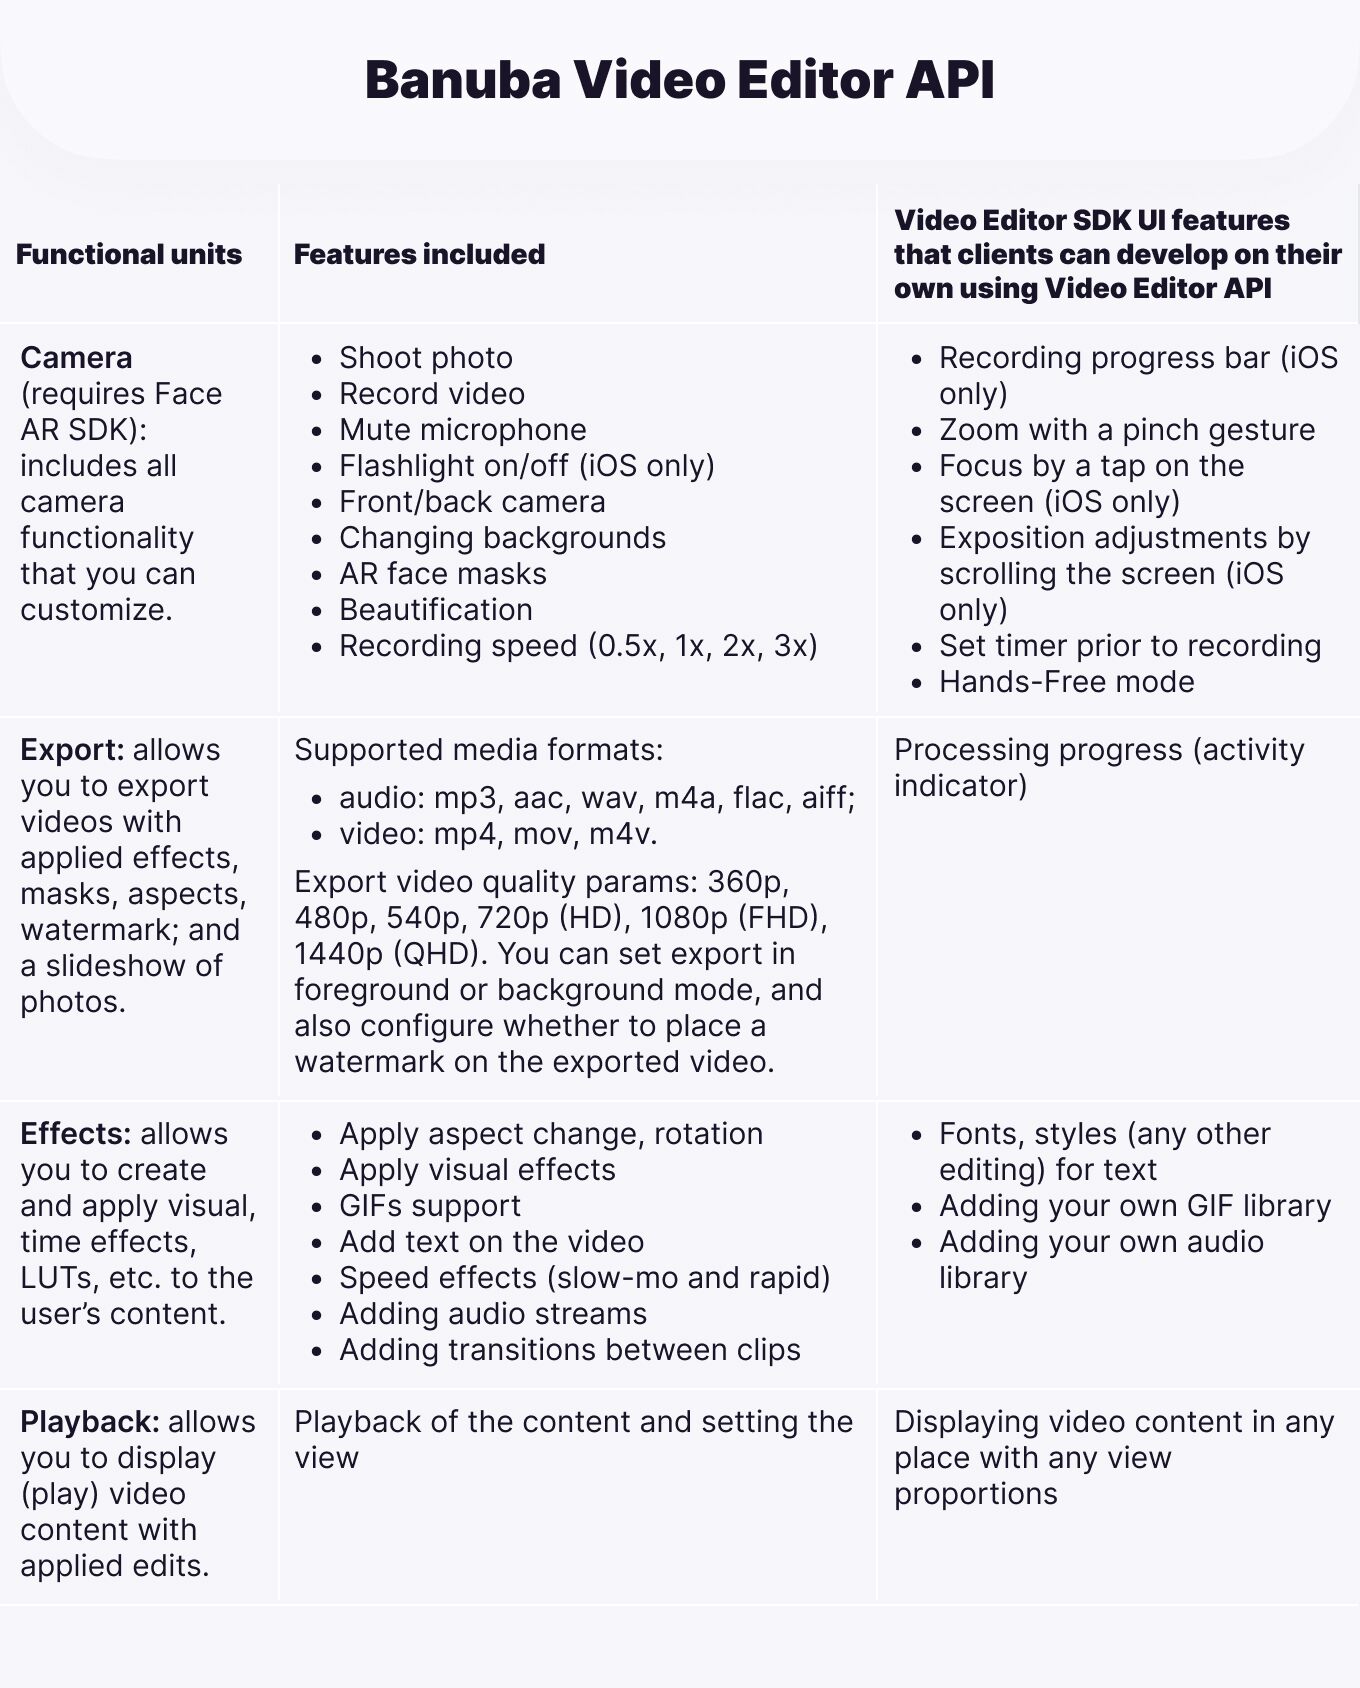
There is, however, another option for those who want or need to modify the UI deeper. Banuba VE SDK has an API version, which sacrifices certain premade features (e.g. progress bars) but allows for more customization.
This is the full list of differences between different versions.
Key Takeaway
- Integrate Banuba’s iOS Video Editor SDK in three steps; begin with a 14-day free trial;
- Requirements: Swift 5.9+, Xcode 15.2+, iOS 15.0+;
- Install via CocoaPods (fastest) or Swift Package Manager (alternative);
- Customize and white-label the editor (icons, colors, fonts, logos, localization, durations).
4 Must-Have Features of an iOS Video Editing Tool
Our solution includes several modules, i.e. video recording, video changing, audio effects and Face AR. Each of them represents a specific set of features.
Recording
The video creation starts from the Recording screen. Here, the user sees the main controls. Tap to create a new video or upload one from the device.

Video tweaking features available on the recording stage
- Turn on beauty filter for video recording to smooth skin
- Apply face or color filters to enhance the image
- Play background music
- Change the recording speed
Other basic video capture features include a hands-free recording, zoom, flashlight, timer and an option to mute the microphone.
Video Editing
Once the recording is done the user proceeds to edit. Banuba's Swift video SDK is where users can show their creativity and achieve stunning videos. It contains video effects, Snapchat-like masks, text, GIF overlays and voice modification features to name but a few.

The timeline makes it easy to organize the add-ons. Whatever the user adds to the video, be that effects, GIF, text or music is shown on the timeline and has its adjustable length.
Video editing features
- Trim video
- Add music
- Record and change voice
- Apply Instagram-like color filters (LUTs)
- Add text, GIFs
- Apply video effects similar to TikTok
- Slow-mo and fast forward videos
- Apply Snapchat-like masks
The license includes a basic kit of popular effects, see examples in 10 Best Video Editing Effects To Integrate Into Your App.
After editing, the user can export a video file or share it. The format and resolutions vary. You can also add a watermark to your app.
Audio Browser
With Audio Browser users can add music and modify the voice in videos. Users can record their voice and add it as a track or change it to sound like a robot or elf.

There are two ways how users can add music to the video:
- Select a track from the video editor library. We offer over 35 GB of tracks in all genres and keys by default. Banuba's
iOS swift video editing
kit also has native integration with Soundstripe if you want more. Moreover, you can integrate other music APIs by your choice. - Upload music directly from a device.
Audio Browser is an optional module. If video editing in your app doesn’t imply music, only voice, you can disable this module to make your app lighter.
Face AR
The Face AR module builds on face recognition and tracking technology. Users can apply Snapchat-like lenses and 3D filters in real-time or as a video effect. They can also change and animate backgrounds, try on accessories, play with triggers, and much more.

Types of video face filters available
- Realistic try-on
- Morphing effects
- Animal and famous character filters
- Video background remover
- 2D/3D face stickers
- 3D facial animation
- Trigger-effects enabled with facial expressions.
Face AR content i.e. 3D masks and face tracking effects can be stored in the AR Cloud. Masks will be downloaded when the user has an internet connection.
Face AR and AR Cloud are optional modules. You may launch your video maker with the basic kit of LUT filters and video effects if your project means to offer minimal tools required to make videos on mobile.
In our example, we integrate the full SDK version for iOS with all of the features described above.
Key Takeaway
- Recording: capture or upload with beauty, smoothing, color and face filters, speed edits, hands-free, zoom, flashlight, timer, mic mute;
- Video Editing: timeline with trim; music & voice with record and modification, LUT filters, text/GIF overlays, effects, Snapchat-like masks; export/share, and optional watermark;
- Audio Browser (optional): add music from in-app library or device, record voice & apply effects;
- Face AR (optional): real-time lenses, virtual try-ons, morphing, 2D/3D stickers, background removal, trigger effects.
6 Use Cases of Using a Video Editor In iOS Apps
Software solution fits into a wide range of communication platforms, short video and social media apps. Here are some of the most popular types of videos your users can create and apps where you can integrate the SDK.
Video Editor SDK Use Cases
Entertainment. Create short video apps like TikTok where users can make entertaining videos and lip sync clips to express their talent and gain popularity.
Social apps. Build communication platforms where users generate videos about what they like most, e.g. fashion, style, food or hobbies.
E-commerce. Video maker built in an e-commerce platform lets users quickly shoot unboxing videos or product reviews, helping you to engage consumers and increase conversion rates.
Communication platforms. Integrate our video maker into your chat app to enrich user conversations. Users can record, edit and send videos right from the app to make their communication more interesting.
Travelling. Allow travellers to create amazing vlogs about their journeys right on mobile.
Education. Empower teachers and learners to interact with video, record lessons and create educational materials enriched with AR filters. We can provide filters by topic helping teachers immerse students into the subject.
One of the best features of Banuba's Swift video editing library is that the user can capture multiple videos within one session. The progress is saved automatically. They all will be displayed on the bar. It’s a convenient way to cut the long process into pieces and join them into a single story. Users can record travel vlogs or document their kids’ birthday party.
With a hands-free mode, they can easily shoot cooking or crafting videos.
Banuba iOS Video Editor Case Studies
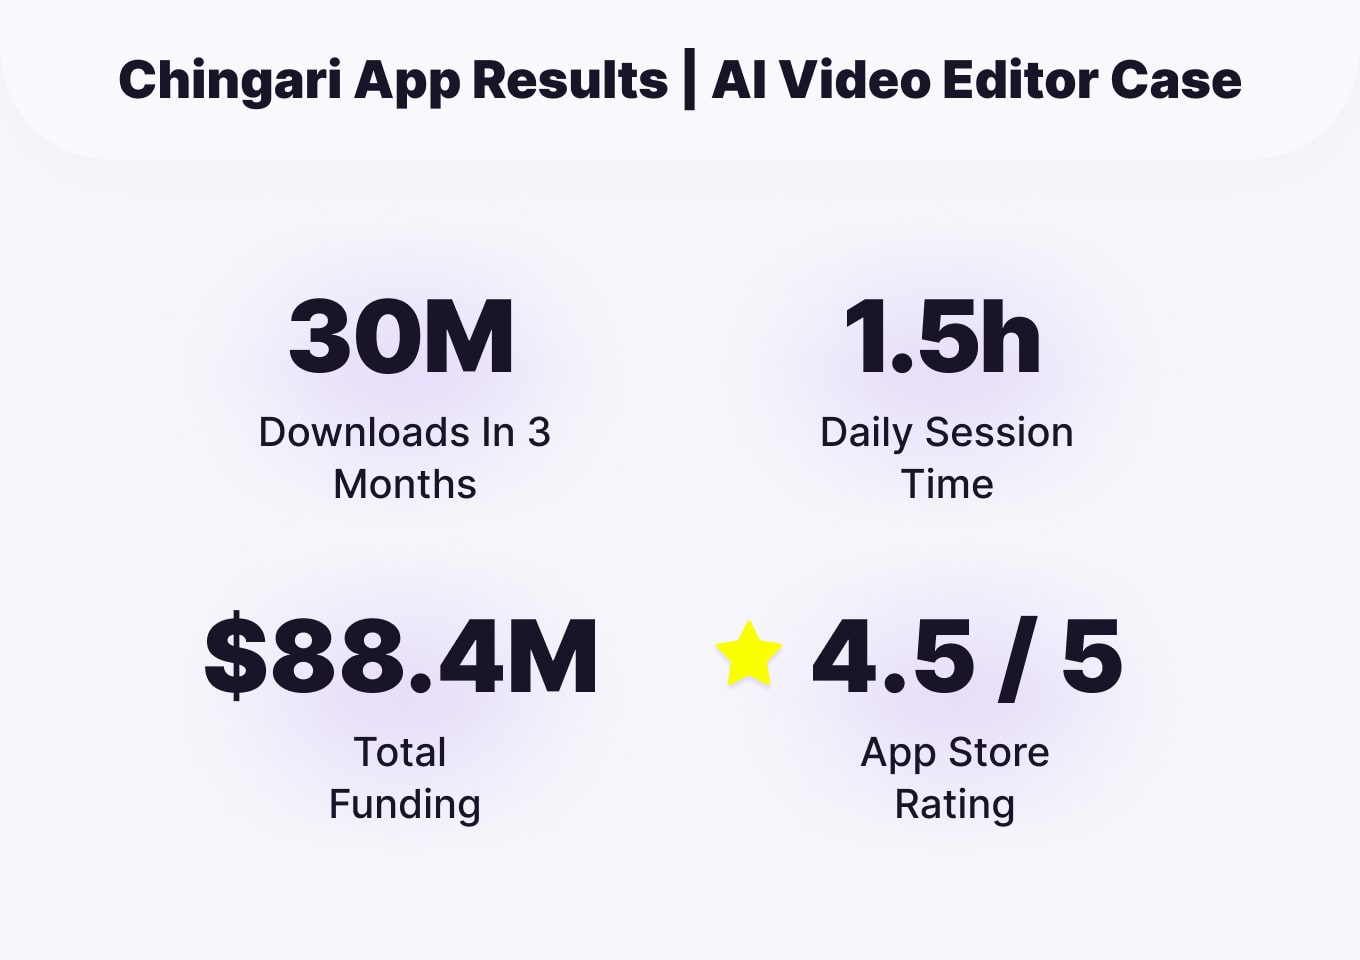
Chingari, the Indian-based video sharing platform, contacted Banuba to integrate our Video Editor and mimic TikTok features in their app. Users create entertaining content using video editing features and effects. In just ten days, the app got 550,000 downloads and over 2.5 million downloads in total.
Another short video social app (iOS, Android) integrated our product to help young people express their talent with video creation. Users can record 15-second video clips using a built-in mobile video editor.
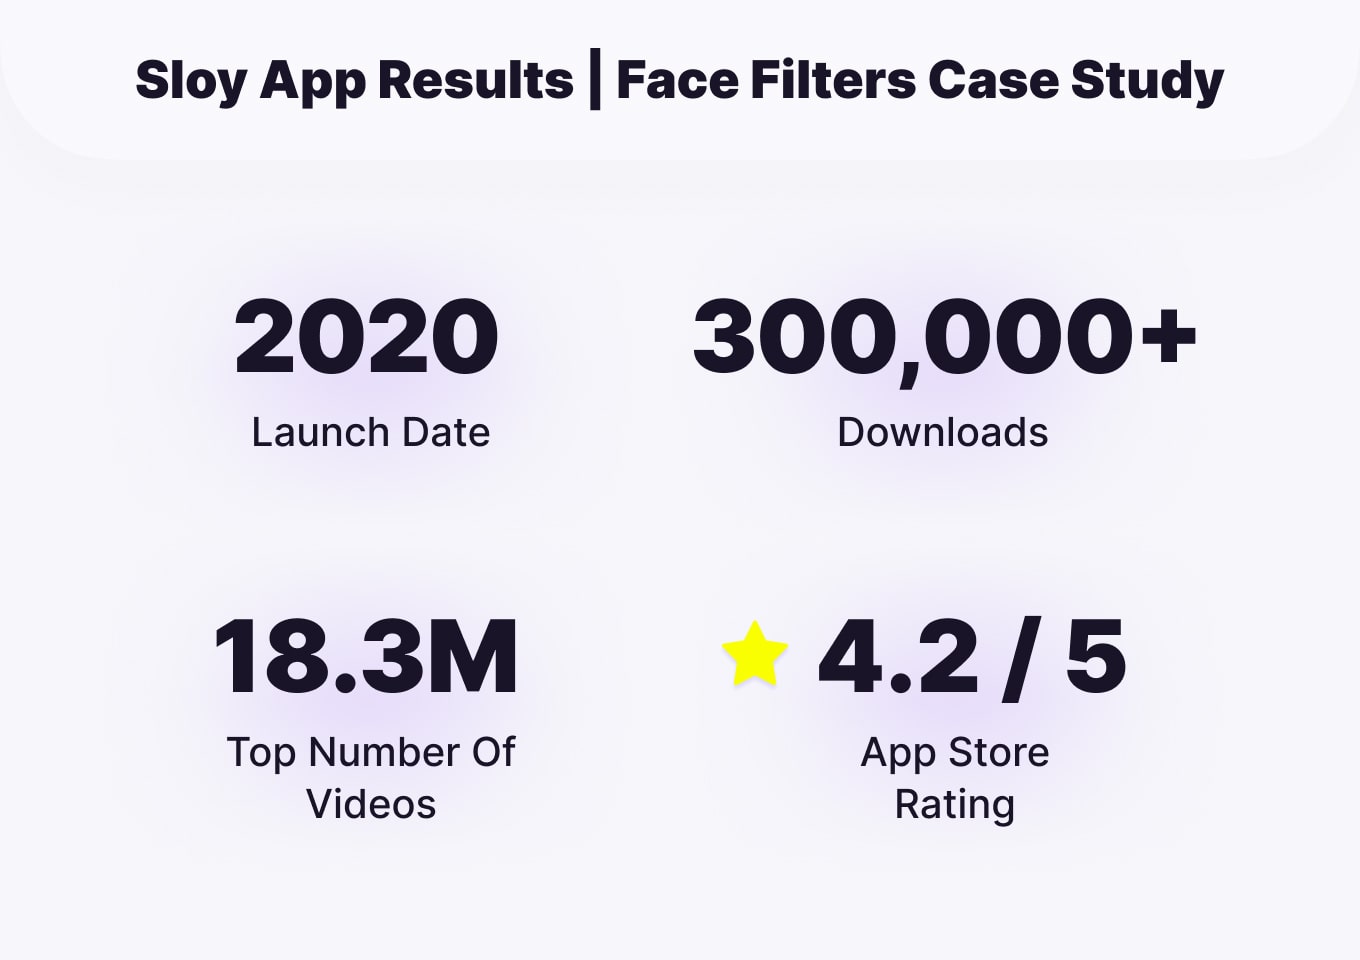
Our video SDK also empowers Sloy, a social app about fashion. Using intuitive tools, users can take 90-second videos about fashion, with automatically recognized tagging for items.
Our team made AR masks designed specifically for the young audience. We assembled a collection of video effects to fit with the app style concept.
Summing Up
Using our SDK with an iOS video editing library is a faster and easier approach than developing a Swift video editor on your own from scratch. Our VE SDK fits into a variety of use cases helping you to deliver the most convenient video tools for your users.
We can personalize AR content and filters based on the audience's interests, age, gender, or geo to fit into your app concept.
Reference List
Apple. (n.d.). Apple Developer Documentation. Apple Developer. https://developer.apple.com/documentation/
Apple. (n.d.). AVAudioEngine. Apple Developer. https://developer.apple.com/documentation/avfaudio/avaudioengine
Apple. (n.d.). AVFoundation. Apple Developer. https://developer.apple.com/documentation/avfoundation
Apple. (n.d.). AVMutableComposition. Apple Developer. https://developer.apple.com/documentation/avfoundation/avmutablecomposition
Apple. (n.d.). AVPlayer. Apple Developer. https://developer.apple.com/documentation/avfoundation/avplayer#overview
Apple. (n.d.). AVVideoComposition. Apple Developer. https://developer.apple.com/documentation/avfoundation/avvideocomposition
Apple. (n.d.). CIFilter. Apple Developer. https://developer.apple.com/documentation/coreimage/cifilter-swift.class
Apple. (n.d.). Metal. Apple Developer. https://developer.apple.com/documentation/metal
Apple. (n.d.). UISlider. Apple Developer. https://developer.apple.com/documentation/uikit/uislider
Banuba. (n.d.). Adding AR video editor and face filters to the fashion app: Case study. Banuba Blog. https://www.banuba.com/blog/adding-ar-video-editor-and-face-filters-to-the-fashion-app-case-study
Banuba. (n.d.). CocoaPods installation (iOS). Banuba Docs. https://docs.banuba.com/ve-pe-sdk/docs/ios/cocapods-installation
Banuba. (n.d.). How to create augmented reality content. Banuba Blog. https://www.banuba.com/blog/how-to-create-augmented-reality-content
Banuba. (n.d.). Swift Package Manager installation (iOS). Banuba Docs. https://docs.banuba.com/ve-pe-sdk/docs/ios/spm-installation
Banuba. (n.d.). Video editor with animation effects for Chingari app: Case study. Banuba Blog. https://www.banuba.com/blog/video-editor-with-animation-effects-for-chingari-app-case-study
Cleveroad. (n.d.). How to make a video editing app. Cleveroad. https://www.cleveroad.com/blog/how-to-make-a-video-editing-app/
Sendbird. (n.d.). SwiftUI vs. UIKit. Sendbird Developers. https://sendbird.com/developer/tutorials/swiftui-vs-uikit
-
Yes, Apple offers free video editing tools. iMovie (macOS/iOS/iPadOS) and Clips (iOS) are free, but they’re end-user apps, not developer tools. If you’re building an editor into your iOS app, you’ll use AVFoundation/Core Image/AVKit (as in this guide) or an off-the-shelf iOS video editor SDK like Banuba to launch faster.
-
Creators typically edit long-form videos in desktop editors like Adobe Premiere Pro, Final Cut Pro, or DaVinci Resolve. You won't be able to embed those into an in-app mobile editor. You’ll have to implement native pipelines (AVFoundation + CIFilter, optionally Metal) or integrate a Swift video editor SDK like Banuba to deliver advanced features on the device.


