
AR isn’t just tech jargon you drop in a conversation. It’s already part of how we shop for clothes, learn new skills, play games, and even chat with friends. In mobile development, it’s gone from a fun “look what we can do” moment to something users actually expect.
Flutter, Google’s open-source toolkit, has been right in the middle of that shift. As it works on both iOS and Android from a single codebase, it’s a no-brainer for building AR features without doubling your workload. And when you add Banuba’s AR SDK into the mix, things really level up, as you get real-time face tracking, interactive effects, and AR experiences that feel built-in, no matter the device you’re using.
[navigation]
TL;DR:
- Flutter helps save time and effort when making apps for both Android and iOS;
- The ar_flutter_plugin is commonly used to enable augmented reality features in Flutter-based apps;
- Follow the guide below to install it;
- Banuba's Face AR SDK lets you add a lot of useful AR functionalities, e.g. face filters and virtual backgrounds;
- The main trends for AR development are cloud AR, collaborative AR, and Web AR.
Why Use Flutter for AR Development?
Flutter’s appeal goes beyond the “write once, run anywhere” promise. For AR, its benefits stack up quickly:
- Huge time saver: One codebase means fewer platform-specific work for iOS and Android.
- Boosted development: Hot reload means you can adjust your AR experience (like AI and general logic) in real time. That way, you don’t have to sit through the typical wait when restarting the app.
- Plugin ecosystem: It includes tools like ar_flutter_plugin, which connects Flutter with the native AR engines for smooth AR integration.
- Extensive widget library: It provides pre-designed components for gesture control, smooth animations, and detailed graphics.
- Leveraging the native features: By using built-in tools like the camera, sensors, and GPS, Flutter helps bring AR features to life.
- Active community: A thriving community of Flutter developers offers constant support, sharing tips, fixes, and ideas to make AR development smoother.
In short, Flutter gives you a flexible foundation. The heavy lifting for AR happens in the native layers, but your Flutter code stays clean and consistent.
Understanding the ar_flutter_plugin
The ar_flutter_plugin is the go-to community library for working with ARKit on iOS and ARCore on Android from Flutter.
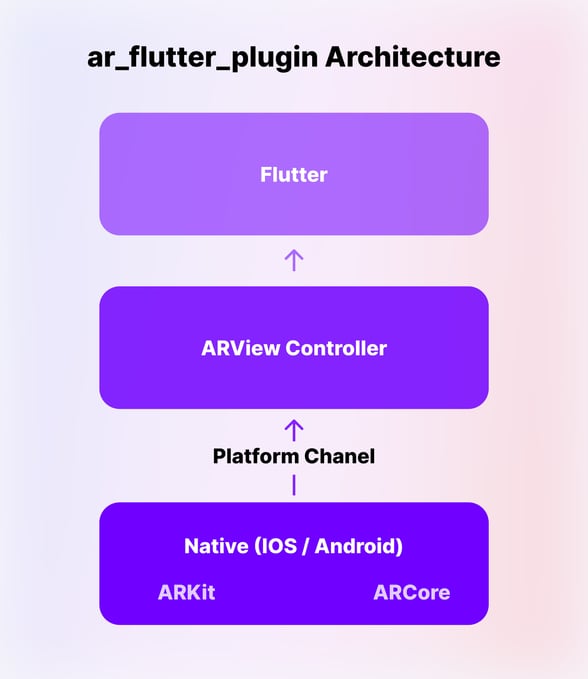
Here’s how it functions:
- Flutter layer: Includes the ARView widget for rendering AR scenes and ARViewController for managing sessions.
- Platform channels: Pass messages between your Dart code and native AR engines.
- Native layers: ARKit runs the show on iOS; ARCore takes care of Android. They handle tracking, rendering, and sensor fusion.
Key features:
- Detects horizontal and vertical planes.
- Supports anchors for placing and tracking objects.
- Renders 3D models directly in AR space.
- Handles AR events, like tapping virtual objects.
Why it’s great:
- Cross-platform harmony: Your AR runs smoothly on both iOS and Android without double the work.
- Built by the crowd: A passionate developer community keeps it improving week after week.
- Easy integration: Works naturally with Flutter.
- Full 3D playground: Creates immersive worlds users can explore in a tap.
- Ready for the future: Designed to grow as AR technology advances.
Setting Up Your Flutter AR Project
1. Add the right dependencies
Getting started with AR takes a bit more than just the plugin. Here’s the minimal setup you need in your pubspec.yaml:
[code]dependencies:
flutter:
sdk: flutter
ar_flutter_plugin: ^0.7.3
permission_handler: ^10.4.0
vector_math: ^2.1.4
flutter:
assets:
- assets/my_model.gltf
# If your GLTF references external .bin/.png files, list them too, e.g.:
# - assets/my_model.bin
# - assets/textures/albedo.png
[/code]
- ar_flutter_plugin — the AR engine bridge for Flutter
- permission_handler — makes camera permission prompts painless
- vector_math — helps with all those 3D calculations behind the scenes
Once added, run:
[code]flutter pub get[/code]
2. Configure iOS and Android permissions
Without camera access, there’s no AR. Both iOS and Android need explicit permissions.
For Android:
Open android/app/src/main/AndroidManifest.xml and add these lines:
[code]<manifest ...>
<uses-permission android:name="android.permission.CAMERA"/>
<!-- Require AR-capable camera. Set required=false if AR is optional -->
<uses-feature android:name="android.hardware.camera.ar" android:required="true"/>
<!-- Recommended: Require OpenGL ES 3.0 -->
<uses-feature android:glEsVersion="0x00030000" android:required="true"/>
<application ...>
...
</application>
</manifest>
[/code]
Tip: Setting android:required="true" hides your app from devices without ARCore support. Set it to false if you want an "AR optional" experience.
2. You also need to set a minSdkVersion of at least 24 for AR functionality. Update android/app/build.gradle:
[code]defaultConfig {
applicationId "com.example.my_ar_app"
minSdkVersion 24
targetSdkVersion 34
versionCode 1
versionName "1.0"
}
[/code]
For iOS:
1. iOS requires a camera usage description in ios/Runner/Info.plist. If it’s missing, the app will crash on camera access:
[code]<key>NSCameraUsageDescription</key>
<string>This app requires camera access to create augmented reality experiences.</string>
[/code]
Using permission_handler? Add the snippet below to your ios/Podfile inside post_install so permissions work on iOS.
[code]post_install do |installer|
installer.pods_project.targets.each do |target|
flutter_additional_ios_build_settings(target)
target.build_configurations.each do |config|
config.build_settings['GCC_PREPROCESSOR_DEFINITIONS'] ||= [
'$(inherited)',
'PERMISSION_CAMERA=1',
]
end
end
end
[/code]
3. Launch your first AR session
With dependencies and permissions in place, you can initialize the AR session in Flutter. The ar_flutter_plugin provides the ARView widget — the core component for rendering AR content.
A basic setup involves a StatefulWidget containing an ARSessionManager, which manages the AR session and responds to events like plane taps.
Time to see it in action! Here’s a quick snippet to set up your AR view and session:
[code]import 'package:flutter/material.dart';
import 'package:ar_flutter_plugin/ar_flutter_plugin.dart';
import 'package:ar_flutter_plugin/datatypes/config_planedetection.dart';
import 'package:ar_flutter_plugin/managers/ar_session_manager.dart';
import 'package:ar_flutter_plugin/managers/ar_object_manager.dart';
import 'package:ar_flutter_plugin/managers/ar_anchor_manager.dart';
import 'package:ar_flutter_plugin/managers/ar_location_manager.dart';
class MyARWidget extends StatefulWidget {
const MyARWidget({Key? key}) : super(key: key);
@override
State<MyARWidget> createState() => _MyARWidgetState();
}
class _MyARWidgetState extends State<MyARWidget> {
late ARSessionManager arSessionManager;
late ARObjectManager arObjectManager;
late ARAnchorManager arAnchorManager;
late ARLocationManager arLocationManager;
final List<ARAnchor> anchors = [];
@override
void dispose() {
arSessionManager.dispose();
super.dispose();
}
@override
Widget build(BuildContext context) {
return Scaffold(
appBar: AppBar(title: const Text('Flutter AR Demo')),
body: ARView(
onARViewCreated: onARViewCreated,
planeDetectionConfig: PlaneDetectionConfig.horizontalAndVertical,
),
floatingActionButton: FloatingActionButton(
onPressed: onRemoveEverything,
child: const Icon(Icons.delete_forever),
),
);
}
Future<void> onARViewCreated(
ARSessionManager sessionManager,
ARObjectManager objectManager,
ARAnchorManager anchorManager,
ARLocationManager locationManager,
) async {
arSessionManager = sessionManager;
arObjectManager = objectManager;
arAnchorManager = anchorManager;
arLocationManager = locationManager;
await arSessionManager.onInitialize(
showFeaturePoints: false,
showPlanes: true,
showWorldOrigin: true,
);
await arObjectManager.onInitialize();
// Set tap handler here or where you prefer
arSessionManager.onPlaneOrPointTap = onPlaneOrPointTapped;
}
Future<void> onRemoveEverything() async {
for (final anchor in List<ARAnchor>.from(anchors)) {
await arAnchorManager.removeAnchor(anchor);
anchors.remove(anchor);
}
}
Future<void> onPlaneOrPointTapped(List<ARHitTestResult> hitTestResults) async {
ARHitTestResult? hit;
for (final r in hitTestResults) {
if (r.type == ARHitTestResultType.plane) {
hit = r;
break;
}
}
hit ??= hitTestResults.isNotEmpty ? hitTestResults.first : null;
if (hit == null) return;
final planeAnchor = ARPlaneAnchor(transformation: hit.worldTransform);
final didAddAnchor = await arAnchorManager.addAnchor(planeAnchor);
if (didAddAnchor != true) return;
final node = ARNode(
type: NodeType.localGLTF2,
uri: 'assets/my_model.gltf', // ensure this exists and is declared in pubspec.yaml
);
final didAddNode = await arObjectManager.addNode(node, anchor: planeAnchor);
if (didAddNode == true) {
anchors.add(planeAnchor);
} else {
await arAnchorManager.removeAnchor(planeAnchor);
}
}
}
[/code]
Think of onARViewCreated as your “AR control panel.” Once it’s called, the ARSessionManager lets you:
- Show or hide detected planes
- Display the world origin with its X, Y, and Z axes
- Handle surface taps to place virtual objects exactly where the user interacts
Building a Simple Flutter AR App Example
With your AR setup ready, it’s time to add some interactivity. A simple AR app lets users tap on real-world surfaces to place virtual objects — and lets you manage those objects on the fly. Let’s go through it step by step.
1. Managing AR sessions and anchors
In your _MyARWidgetState class from the previous example, you already have an ARSessionManager. You'll need to add an ARAnchorManager as well. This manager is responsible for object placement and tracking. Anchors act like invisible pins, holding virtual objects steady as the user moves around.
Add this to your class:
[code]late ARAnchorManager arAnchorManager;[/code]
Then, in onARViewCreated, initialize it alongside the session manager and set up a tap event handler:
[code]void onARViewCreated(
ARSessionManager arSessionManager,
ARObjectManager arObjectManager,
ARAnchorManager arAnchorManager,
ARLocationManager arLocationManager,
) {
this.arSessionManager = arSessionManager;
this.arAnchorManager = arAnchorManager;
arSessionManager.onInitialize(
showFeaturePoints: false,
showPlanes: true,
showWorldOrigin: true,
);
// Handle taps to place objects
arSessionManager.onPlaneOrPointTap = onPlaneOrPointTapped;
}
[/code]
2. Handling taps to place 3D objects
The core of interactivity is letting users tap a surface to drop a virtual object. Here’s the workflow:
- Detect a plane: The AR session detects flat surfaces.
- Hit test: When the user taps, we check if the tap intersects a detected plane.
- Place object: If it does, we create an ARAnchor and attach a 3D model via an ARNode.
Start by adding a list to track placed anchors:
[code]final List<ARAnchor> anchors = [];
Future<void> onPlaneOrPointTapped(List<ARHitTestResult> hitTestResults) async {
ARHitTestResult? hit;
for (final r in hitTestResults) {
if (r.type == ARHitTestResultType.plane) {
hit = r;
break;
}
}
hit ??= hitTestResults.isNotEmpty ? hitTestResults.first : null;
if (hit == null) return;
final newAnchor = ARPlaneAnchor(transformation: hit.worldTransform);
final didAddAnchor = await arAnchorManager.addAnchor(newAnchor);
if (didAddAnchor != true) return;
final newNode = ARNode(
type: NodeType.localGLTF2,
uri: 'assets/my_model.gltf', // Replace with your model; declare in pubspec.yaml
);
final didAddNode = await arObjectManager.addNode(newNode, anchor: newAnchor);
if (didAddNode == true) {
anchors.add(newAnchor);
} else {
await arAnchorManager.removeAnchor(newAnchor);
}
}
[/code]
This lets users tap on any detected surface and instantly place your 3D model right there.
3. Clearing the scene
For a smooth experience, it’s helpful to let users clear all placed objects. Add a floating action button in your build method:
[code]@override
Widget build(BuildContext context) {
return Scaffold(
appBar: AppBar(title: const Text('Flutter AR Demo')),
body: ARView(
onARViewCreated: onARViewCreated,
planeDetectionConfig: PlaneDetectionConfig.horizontalAndVertical,
),
floatingActionButton: FloatingActionButton(
onPressed: onRemoveEverything,
child: const Icon(Icons.delete_forever),
),
);
}
[/code]
Then, implement the removal logic:
[code]Future<void> onRemoveEverything() async {
for (var anchor in anchors) {
await arAnchorManager.removeAnchor(anchor);
}
anchors.clear();
}
[/code]
The AR app is now fully functional:
- Plane detection is active
- Users can place 3D models via tap interactions
- Scene can be cleared programmatically
From this point, gestures like rotation and scaling, handling multiple objects, or adding Banuba’s filters can extend your AR experience in Flutter.
Advanced AR Features with Banuba's SDK
“Banuba’s Face AR SDK provides developers with high-fidelity face tracking and AI-driven effects optimized for Flutter. It’s designed to streamline AR app development, letting you focus on crafting interactive, expressive, and socially engaging applications without worrying about the underlying complexity” - Dmitry Ogievich, CEO at Banuba
While ar_flutter_plugin gives you a solid starting point, Banuba’s AR Flutter SDK takes things much further.
It’s a powerful face tracking SDK for many face- and body-related applications. Its features include:
- Advanced face detection and tracking: Banuba’s Face AR SDK engine reads the human face with incredible accuracy, down to the pixel. It can follow several faces at once and still perform well in tricky situations like low light or tilted angles.
- Real-time AR effects and filters: Banuba’s beauty AR SDK comes loaded with a massive library of live effects you can drop straight into your app. It includes 3D face filters and masks, AI beautification, and virtual try-on features (like realistic placement of glasses, hats, earrings, and makeup).
- Virtual backgrounds and “weatherman” mode: Instantly replace the user’s real environment with static visuals or dynamic video loops. And with the new “weatherman” feature, users can appear overlaid on top of live or pre-rendered content without requiring a chroma key setup. This makes it easier for developers to add broadcast-quality overlays directly into apps with minimal integration effort.
- Customizable AR experiences: Banuba gives developers everything they need to craft unique, branded AR content. With its Effects Studio, you can design custom 2D and 3D filters and drop them straight into your app. Plus, the extensive asset store with over 1000 filters that can be licensed.
- and many more, like hand and gesture tracking, color filters, voice changer, etc.
Banuba Face AR SDK has a lot going for it:
- Easy to integrate: It’s distributed as a Maven package, an AR Flutter plugin, a CocoaPods pod, etc.
- Easy to create content for
- 9+ years on the market – stable performance and lots of integration cases
- Low battery, CPU and GPU resource consumption
- Expansive but flexible feature set – only take what you need
With that out of the way, let’s get down to integrating. It is very simple and requires only a few lines of code.
Implementing Banuba Face AR SDK
This is how you can implement the Flutter version of Banuba FaceAR SDK. You can use it as a library, which requires only a few lines of code – the advantage of it being an AR Flutter plugin.
Token
The first step is getting the SDK and the trial token so you will have 14 days to test everything. To receive both, send us a message.

Depend on it
Run this command with Flutter:
[code]$ flutter pub add banuba_sdk[/code]
This will add a line like this to your package's pubspec.yaml (and run an implicit flutter pub get):
[code]dependencies:
banuba_sdk: ^1.6.0
[/code]
Alternatively, your editor might support flutter pub get. Check the docs for your editor to learn more. You can also find the Banuba SDK package on pub.dev.
Import it
Now in your Dart code, you can use:
[code]import 'package:banuba_sdk/banuba_sdk.dart';[/code]
Feel free to check out more information about the integration of Banuba FaceAR SDK here. For a complete example of the integration, you can also check out the Flutter integration sample on GitHub.
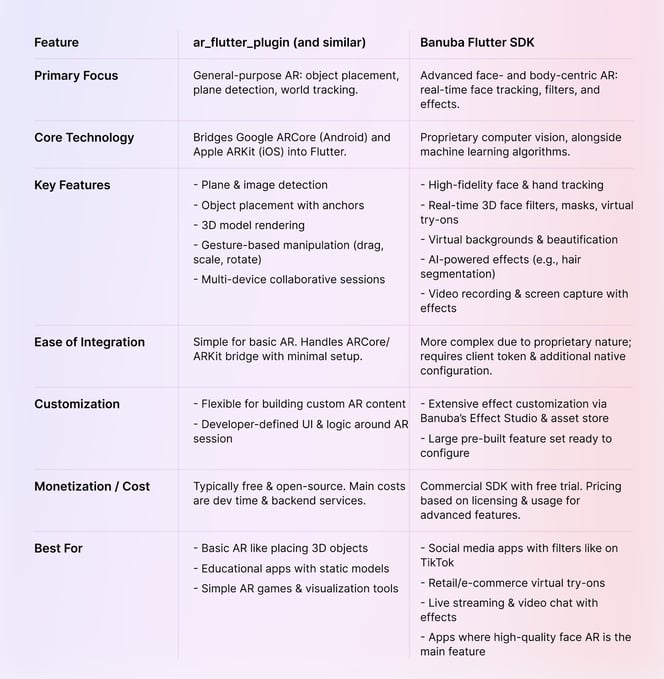
Comparison: Banuba Flutter SDK vs. ar_flutter_plugin
When you start building AR in Flutter, you’ll find yourself at a crossroads: do you choose a versatile AR toolkit or a fine-tuned one for face magic? On one side, there’s ar_flutter_plugin, connecting Flutter to ARCore and ARKit. On the other, there’s Banuba’s Flutter SDK, built for high-precision face and body tracking. This table will walk you through how they stack up, so your decision is based on full clarity.
Flutter SDK vs. ar_flutter_plugin
Testing and Debugging Flutter AR Apps
AR app testing is unlike traditional app testing because it involves the physical environment, hardware limitations, and live performance. Here’s how to approach testing, manage device compatibility, and optimize your Flutter AR experiences.
1. Testing & debugging: Go outside
You can’t fake reality. AR apps need real environments to reveal their bugs and glitches. So take your phone and actually test them out in different scenarios:
- Light experiments: Natural light, soft lamp light, cold office LEDs.
- Surfaces: Glass tables, tile floors, messy desks.
- Motion: Spin, stroll, strut around your virtual objects.
- Random events: Let your cat, a swinging door, or a moving chair interfere.
You’ll be amazed how often an app that works fine on your desk completely loses its mind in a living room.
Your debugging arsenal:
- Flutter DevTools: Keep an eye on CPU, GPU, and dropped frames. Anything below 30 FPS is where the AR may start looking not as expected.
- Native tools: ARCore (Android) and ARKit (iOS) run natively under Flutter. Monitor memory, camera streams, and AR session performance with Xcode’s debugger or Android Studio’s Profiler.
- Logging: Use comprehensive logging with print() or developer.log() to track the state of your AR session. Log when an anchor is added, when a plane is detected, and when a tap event occurs.
- Physical devices: Emulators and simulators don't have cameras and motion sensors, so they are practically useless for testing AR functionality. You must test on a variety of physical Android and iOS devices.
2. Device compatibility: Don’t assume everyone’s phone can do AR
- ARCore (Android) — Needs compatible hardware and Android 7.0+
- ARKit (iOS) — Needs at least an A9 chip and iOS 11+
Always check the official lists of ARCore supported devices and ARKit requirements.
3. Performance optimization: Keep it smooth
A great AR app should feel seamless. If your models take forever to load, frames drop, or the UI stutters, users will notice.
- 3D assets:
- Use low-poly models without losing visual quality.
- Compress textures (GLTF or GLB are your friends).
- Widget rebuilds:
- The Flutter widget tree can be a performance bottleneck. Use const widgets wherever possible and employ state management solutions (like Provider or BLoC) to rebuild only the necessary parts of the UI, not the entire screen, when state changes.
- Rendering:
- The ARView widget is a GPU-intensive component. Avoid overlaying complex, animated Flutter widgets on top of it unless necessary.
- Avoid heavy transparency effects; they’re expensive to render.
- Memory management:
- Dispose of AR managers (ARSessionManager, ARAnchorManager, etc.) when done.
- Memory leaks here equal slowdowns and eventual crashes.
Use Cases and Industry Applications
Flutter AR apps are already making waves in:
- Retail: Virtual product try-ons for eyewear, clothing, makeup, furniture, and more.
- Education: Interactive 3D models and simulation of high-risk tasks.
- Entertainment: Real-time face animations, AR object placement, and location-based games.
- Marketing: Creation of branded AR filters and event-driven campaigns to attract more customers.
No wonder, Banuba’s AR SDK is a tool that has been successfully implemented in many domains: video chats with millions of users, mobile games, wellness apps, vision screening software, and more. One great example may be b.stage, a SaaS fandom platform that used Banuba’s tech for live streaming and video chat. By adding high-quality face filters and beautification effects, the platform reached 1 million monthly active users in just two years, showcasing the power of rich, interactive AR to drive user engagement and rapid growth.
Future Trends in Flutter AR Development
The Flutter AR world is evolving fast. What used to be “place a 3D object on a plane” is now moving toward multi-user, persistent, cloud-powered experiences. Here’s what’s happening and why you should care as a developer.
1. Collaborative AR
Single-user AR is fun, but collaborative AR is where things get exciting.
- Real-time interaction: Architects reviewing a virtual building on a table? Everyone sees updates instantly, no matter where they are.
- Location-based games: Players in different cities, same AR world, same leaderboard. Multiplayer AR is real.
- How you pull it off: You need a backend that keeps all devices in sync. Flutter + Firebase or other real-time databases handle this well, letting you focus on the AR logic instead of networking headaches.
2. Cloud-based AR
AR isn’t just about what happens while the app is open. Cloud AR lets you go persistent.
- Persistent anchors: Close the app, reopen it, and your virtual object is still there.
- Large-scale world mapping: Build AR layers tied to real-world locations.
- Performance wins: Offload heavy 3D rendering or AI processing to the cloud. Devices don’t need to be beasts to run advanced AR.
3. Cross-platform and Web AR
Flutter’s cross-platform nature is more relevant than ever. Your AR experience shouldn’t be trapped on a single device.
- Web AR: AR in a browser without any downloads. Perfect for demos, marketing campaigns, or quick interactive content. Flutter + WebAssembly makes it smoother than ever.
- AR wearables: Smart glasses and headsets are coming. Flutter lets you “write once, run anywhere”, so when the hardware stabilizes, you’re ready.
Flutter AR: What’s Next for Developers

Conclusion
For AR developers, Flutter offers efficiency: write once, run natively everywhere. While basic AR plugins handle standard 3D object placement, combining Flutter with Banuba’s SDK unlocks advanced, face-focused AR capabilities, giving your apps a professional edge.
Integrating an augmented reality SDK is a reliable way to decrease development time and expenses, as well as to gain many advanced features quickly. Banuba FaceAR SDK is an AR Flutter plugin that can compound on these advantages with its own: ease of implementation, ease of content creation, many useful features, etc. As you can see, it’s possible to add it to your Flutter app in a matter of minutes. So don’t hesitate to request a free trial and try everything yourself.
Reference List
AR SDK powered with patented face tracking. (n.d.). Banuba.
ARCore supported devices. (n.d.). Google for Developers. https://developers.google.com/ar/devices?hl=en
ar_flutter_plugin - Dart API docs. (n.d.). https://pub.dev/documentation/ar_flutter_plugin/latest/
Banuba. (n.d.). GitHub - Banuba/ve-sdk-flutter-integration-sample: How to integrate Banuba Video Editor with a Flutter app - for iOS and Android. GitHub. https://github.com/Banuba/ve-sdk-flutter-integration-sample
Banuba Asset Store. (n.d.). https://assetstore.banuba.net/
banuba_sdk | Flutter package. (n.d.). Dart Packages. https://pub.dev/packages/banuba_sdk
Flutter - Build apps for any screen. (n.d.). https://flutter.dev/
Getting started | Banuba SDK V1.17.4. (n.d.). https://docs.banuba.com/far-sdk/tutorials/development/basic_integration
Hot reload. (n.d.). Flutter. https://docs.flutter.dev/tools/hot-reload
How can I get my trial? (n.d.). https://www.banuba.com/faq/how-can-i-get-my-trial
Krasko, A. (2024a, May 28). Vision screening for 10,000 kids via UNICEF program. https://www.banuba.com/blog/vision-screening-for-10000-kids-eyebou-success-story
Krasko, A. (2024b, May 29). 15 million AR Engagements: How Face AR SDK helped Bermuda thrive. https://www.banuba.com/blog/bermuda-face-ar-sdk-case
Krasko, A. (2024c, December 5). How Clash of Streamers NFT Game Got 4M Installs with Face AR SDK. https://www.banuba.com/blog/clash-of-streamers-nft-face-ar-sdk-case
Krasko, A. (2025a, February 7). Banuba launches effects studio. https://www.banuba.com/blog/banuba-launches-effects-studio
Krasko, A. (2025b, February 20). Banuba helped a wellness company get 20,000+ downloads. https://www.banuba.com/blog/faceyoga-by-mental-growth-a-success-story
Krasko, A. (2025c, August 5). 1 million MAUs in 2 years for a SAAS fandom platform. https://www.banuba.com/blog/1-million-maus-in-2-years-for-a-saas-fandom-platform
Krasko, A. (2025d, August 5). Banuba launches a “Weatherman” feature for Face AR SDK. https://www.banuba.com/blog/banuba-launches-a-weatherman-feature-for-face-ar-sdk
Technologies, C. (n.d.). Title of the blog. Consagous Technologies. https://www.consagous.co/blog/10-ways-to-optimize-your-flutter-apps
Verifying device support and user permission | Apple Developer Documentation. (n.d.). Apple Developer Documentation. https://developer.apple.com/documentation/arkit/verifying-device-support-and-user-permission
-
The official technical documentation for Banuba Face AR SDK is available online and includes requirements, setup instructions, and configuration details:
- Banuba Face AR SDK iOS documentation
- Banuba Face AR SDK Android documentation
- Banuba Face AR SDK Flutter documentation
- Banuba Face AR SDK React Native documentation
- Banuba Face AR SDK Web documentation
- Banuba Face AR SDK Unity documentation
- Banuba Face AR SDK Desktop documentation
This Banuba Face AR SDK documentation should be your primary reference during integration.
-
You can access official integration code samples for the Banuba Face AR SDK on GitHub. Banuba provides platform-specific examples to help you integrate faster:
- Banuba Face AR SDK iOS integration code sample
- Banuba Face AR SDK Android integration code sample
- Banuba Face AR SDK Flutter integration code sample
- Banuba Face AR SDK React Native integration code sample
- Banuba Face AR SDK Desktop integration code sample
- Banuba Face AR SDK Web integration code sample
- Banuba Face AR SDK Unity integration code sample
These Banuba Face AR SDK repositories include setup instructions and minimal working examples for quick deployment.
-
Yes. The Banuba Face AR SDK includes an LLM-friendly documentation file designed for AI-assisted development and internal knowledge systems:
This structured Banuba Face AR SDK text file can be used with AI tools to streamline onboarding and developer workflows.
-
The Banuba Face AR SDK provides official cross-platform plugins to simplify integration into hybrid applications:
These Banuba Face AR SDK plugins are maintained by Banuba and support faster implementation for cross-platform apps.