

[navigation]
TL;DR
- A virtual try-on plugin has four parts: a face-tracking and rendering engine, a digitized product catalog, a storefront UI trigger, and cart synchronization. Only the last two are genuinely store-specific.
- Banuba TINT is web-based and loads from a CDN as a script plus a custom tint-vto element, so there is no app to install and no native mobile build to maintain.
- The Banuba TINT widget can be launched in under two weeks, which is the realistic upper bound for a first store integration.
- Banuba's Shopify path is a theme snippet plus a product-page button block, with SKUs stored in the format product_id-variant_id so the widget can match a Shopify variant to a digitized product.
- Cart sync is event-based: your storefront listens for addToCart, removeFromCart, and redirectToCart and posts to the Shopify cart API. This is the part every team writes themselves.
- Product digitization is self-service in the Banuba TINT Admin Dashboard: makeup shades are generated from product parameters (type, region, finish, coverage, hex color), glasses from three frame photos, and large catalogs from a CSV bulk upload.
- Category breadth is wide: six accessory categories (hats, glasses, scarves, jewelry, eye lenses, nail polish) plus 13 makeup types in the bulk-upload template.
- Try-on runs in the browser on the shopper's device, and Banuba does not collect, store, or process shopper camera data.
- Océane, a Brazilian beauty brand, raised its add-to-cart rate from the 3% industry average to 20.15% in the first month with Banuba TINT, and later peaked at 32%.
- Banuba's plugin page reports up to 1000% higher add-to-cart rate, up to 300% higher conversions, and up to 60% lower return rates for stores running AR try-on.
What does a virtual try-on plugin actually have to do?
Strip away the marketing, and a try-on plugin is four subsystems.
- The first is the engine: real-time face tracking, landmark detection, and rendering that survives movement, lighting changes, and different skin tones.
- The second is the product catalog: every SKU a shopper can try must exist as a digital asset, whether that is a shade profile for a lipstick or a 3D-ready set of frame textures for glasses.
- The third is the storefront surface: a button on the product page, a modal, a camera permission flow, and a fallback when the shopper declines the camera.
- The fourth is commerce: the try-on session has to write back into the store's cart, or the entire experience is a demo rather than a sales channel.
Teams that build all four in-house spend most of their time on the first two, which are computer-vision problems, not commerce problems. Teams that adopt an engine spend their time on the third and fourth, which is where store-specific logic actually lives. That is the trade this article is about, and it is why Banuba packages the engine, the digitization pipeline, and the storefront module together as a virtual try-on plugin rather than as a bare library.
Should you build the engine from scratch or use an SDK?
Building from scratch is defensible in exactly one case: try-on is your product, not a feature of your store. Everyone else is choosing between two timelines.
The from-scratch path means training or licensing face-tracking models, tuning shade rendering so a foundation looks right on every skin tone, building an asset pipeline that turns a supplier's product data into a renderable material, and then maintaining all of it across browser releases. The pain points buyers report with existing try-on tools are instructive here, because they are the hard parts: colors that display inaccurately, products that do not sit correctly on the face, and lighting that breaks the illusion.
The SDK path means the engine, the shade model, and the digitization tooling arrive as a product. The Banuba TINT widget is delivered from a CDN as a script import and a custom element, configured with a merchant ID that controls which features are enabled for your store. It is web-based, so it runs on the last two major Safari and iOS versions and the last five Chrome, Opera, Edge, and Samsung Internet versions, with an HTTPS connection required for camera access. There is no app for the shopper to download.
Honest trade-off: with an SDK, you inherit someone else's rendering roadmap and someone else's UI primitives. Banuba offsets this with a white-label option and UI customization, but if you need a rendering behavior that is not on the roadmap, you will be waiting for it rather than writing it.

How do you connect the plugin to a Shopify store?
Shopify is the platform most ecommerce teams ask about first, and Banuba TINT documents a four-step path.
You start in a duplicated theme, never the live one. You add the widget script and the tint-vto element near the top of the body in theme.liquid, so the widget is available on product pages. You then add a button block to the product template, which renders the try-on button and holds the logic that opens the widget, requests the webcam, and applies the current product.

The critical detail is the SKU. Banuba TINT expects the SKU in the format product_id-variant_id, using the Shopify product and variant IDs. Get this wrong, and the try-on button will simply not appear, because the widget checks whether the SKU exists in your digitized catalog before rendering the button. That check is deliberate: it prevents a shopper from clicking try-on for a product that has no digital asset behind it.
Finally, you customize the button in the theme editor (text, color, font size, border, padding) and test on the real product page rather than in the theme preview, because the camera cannot open in customization preview mode.
Banuba's plugin is also listed on the Shopify App Store, and the same widget is compatible with Wix, Cafe24, WooCommerce, Shoptet, OpenCart, and Tiendanube.
Banuba's makeup virtual try-on example
How does try-on write back into the cart?
This is the part no SDK can do for you, because it is your store's checkout logic.
The Banuba TINT widget emits three commerce events that your storefront code listens for. addToCart fires when the shopper adds a tried-on product, and your handler maps the shade or variant the shopper selected back to a Shopify variant ID and posts it to the cart. removeFromCart reverses that. redirectToCart closes the widget and sends the shopper to the cart page.
The widget API gives you the rest of the control surface: open and close for the modal, useWebcam for the camera stream, useImage for a photo fallback when the shopper denies camera access, isCustomerSkuExist for the button-visibility check, and applyProduct or applyProductByCustomerSku to load the product the shopper is looking at. An isolated SKU mode focuses the widget on a single product, which is the right default for a product detail page.
Plan for the camera refusal case from day one. If useWebcam resolves without a stream, the documented pattern is to fall back to a model photo through useImage so the shopper still sees the shade rather than an error state.
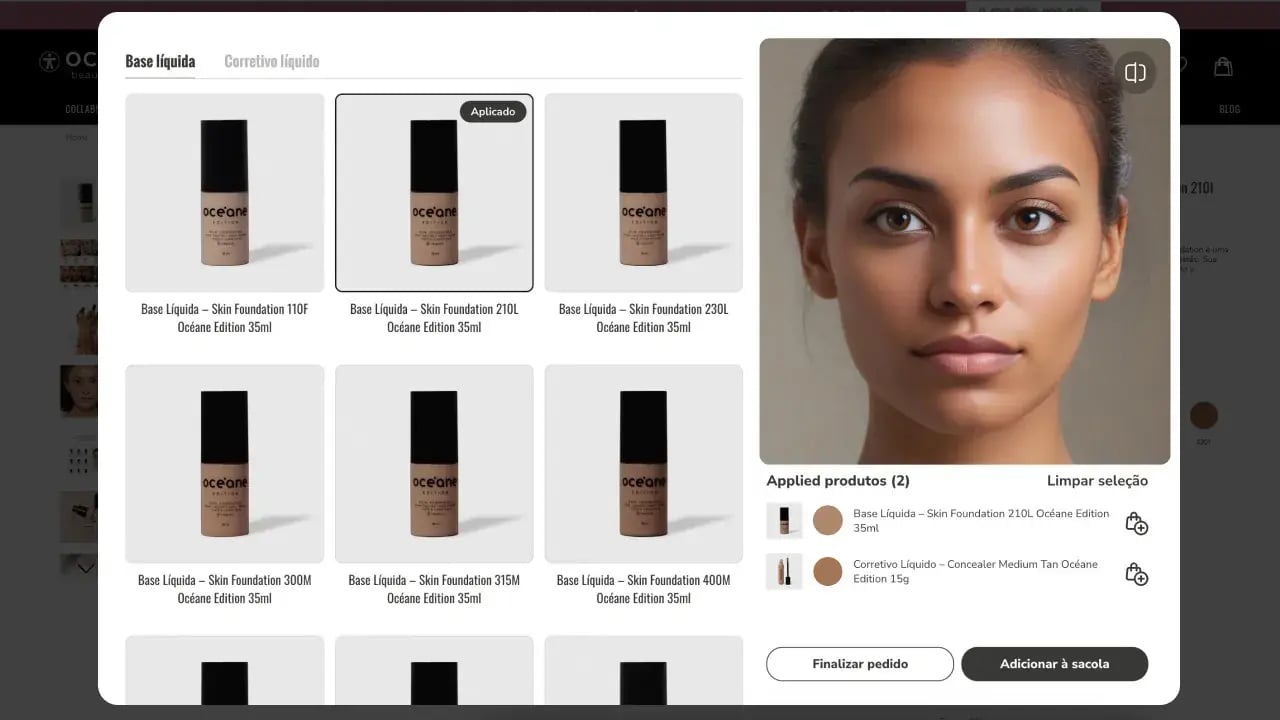 Banuba's virtual try-on interface example
How do you digitize a catalog without a 3D team?
A try-on plugin is only as good as the number of SKUs it can actually render, and this is where in-house projects usually stall.
Banuba TINT handles digitization in a self-service Admin Dashboard, currently in beta. For makeup, you do not model anything: you fill in the product card (name, brand, image, SKU) and the try-on parameters (product type, region of the face, finish, coverage level, and the shade as a hex color), and the shade is generated for you. Multi-variant products such as an eyeshadow palette are handled by adding colors to the same product.

For glasses, you upload three photos of the frame (left, body, right) and preview the result before saving. For a large catalog, the CSV bulk upload template takes the same fields, and Banuba's documentation is explicit that the SKU column is the one that matters most, because it is what the widget's applyProductBySKU and add-to-cart calls key on.
Breadth is the point here. The widget covers hats, glasses, scarves, jewelry, eye lenses and nail polish as accessory categories, and the bulk-upload template alone covers 13 makeup types, from foundation and concealer through lipstick, gloss, eyeshadow, eyeliner, and brows.
What results should you expect once it ships?
Try-on is one of the few ecommerce features with an unambiguous conversion signal, because you can compare the add-to-cart rate of sessions that used it with sessions that did not.
The clearest Banuba data point is Océane, a Brazilian cosmetics manufacturer and retailer. It piloted TINT on two categories only, concealer and foundation, and the add-to-cart rate for those products moved from the 3% industry average to 20.15% within the first month, a lift of more than 600%. The pilot sold through stock faster than the company could manufacture more. The rate later peaked at 32%, which means roughly a third of shoppers who tried a product on placed it in their cart.
At the aggregate level, Banuba reports up to a 10x (1000%) higher add-to-cart rate, up to 300% higher conversions, and up to 60% lower return rates for stores running its AR try-on. Return-rate reduction is the number worth watching if you sell foundation or frames, because a wrong shade or a wrong frame width is the single most common reason a beauty or eyewear order comes back.
TINT virtual try-on plugin in action
What does a realistic build timeline look like?
For a Shopify store with a digitized catalog, the integration is a theme snippet, a button block, a cart-event handler, and a round of testing. The Banuba TINT widget documents a launch window of under two weeks for a ready-made deployment, and the storefront work above is what fills it. The variable that actually stretches the timeline is catalog size: 20 SKUs is an afternoon in the Admin Dashboard, and several hundred is a bulk-upload exercise plus a QA pass on shades.
Compare that with the in-house alternative, where two weeks is roughly the time it takes to evaluate face-tracking libraries.
-
It is a module on a product page that uses the shopper's camera to render a product on their face in real time, then feeds the result back into the cart. Banuba's virtual try-on plugin packages the AR engine, the product digitization tooling, and the storefront button together, so the store team integrates rather than builds.
-
Not on Shopify or Tiendanube, where the plugin installs from the platform's marketplace. On other CMS platforms or a custom storefront, you add the widget script and the try-on element to your templates and handle the cart events yourself. Banuba's TINT documentation covers the full integration path, including the isolated-SKU mode for product detail pages.
-
Makeup, glasses, hats, scarves, jewelry, eye lenses and eyelashes, plus hair color. The same Banuba engine covers beauty and eyewear, including virtual glasses try-on, so a store with a mixed catalog does not need two vendors.
-
Try-on runs in the browser on the shopper's device. Banuba does not collect, store, or process the camera feed, which is why the plugin can be deployed without adding a new data processor to your privacy policy. The same on-device approach underpins Banuba Web AR for browser-based experiences. Check your own consent flow anyway, since the browser still prompts for camera permission.
-
Yes. Banuba runs a public TINT demo you can open in a browser, and a free trial on the plugin itself. Trialing with two or three of your own SKUs is the fastest way to see how your shades render before committing to a full catalog upload.
-
For custom apps rather than storefronts, Banuba offers a full Makeup Virtual Try-On SDK with AR makeup rendering, shade matching, and cross-platform support. The plugin is the right choice when the store is the product surface; the SDK is the right choice when you are shipping your own app.
