How to Build a Video Editor in React Native
Over 90% of mobile users now consume video content weekly. But here’s the twist: they’re not just watching it anymore. They’re creating, trimming clips, dropping filters, adding music, and beyond.
If you’re building a React Native app and not offering these editing tools, you’re already behind. The good news is that you don’t need to build a video editor from scratch. In this guide, we’ll show you how to integrate Banuba’s powerful React Native video editor SDK or IMG.LY, as well as open-source tools like react-native-ffmpeg, expo-image-picker, and react-native-skia. These solutions offer developers flexibility to optimize performance, speed, and customization. Keep in mind, commercial SDKs typically require a license or trial token to unlock full functionality and begin testing before production.
[navigation]
TL;DR:
- React Native helps speed up development by up to 30% for multiplatform apps;
- A ready-made video editor provides most or even all the features your users need to make content;
- Open-source libraries like react-native-ffmpeg enable high customizability for advanced projects;
- Media selection can be easily handled with libraries like expo-image-picker;
- Advanced UI elements can be implemented using react-native-skia;
- Most video editor SDKs require a trial token or license during setup;
- Official documentation is essential for correct configuration and troubleshooting, especially when working with native dependencies
- Banuba Video Editor SDK offers easy integration, plenty of editing features and effects;
- To integrate it, follow the guide below.
Why React Native
For the last few years, this technology has remained the most popular framework for developing cross-platform mobile applications.
It uses the popular JavaScript and boasts up to 95% code reuse between Android, iOS, and Web. This means if you build a video editor with React Native, your work would become more efficient, with the total development time decreasing by up to 30% for a multiplatform app.
React Native projects typically rely on familiar JavaScript tooling such as npm or Yarn for dependency management, along with native platform tools like CocoaPods for iOS. Understanding this ecosystem is important when integrating video SDKs, as setup often involves installing packages, syncing native dependencies, and rebuilding the app.
All in all, using React Native will save many weeks of work and allow you to go to market much faster. For more details, see our article: “How to develop a mobile video editor app”.
What Makes a React Native Video Editor Useful?
Short-form video is dominating mobile apps. And it’s not just entertainment: video drives 80% more conversions in commerce, learning, and fitness apps too.
But users don’t just want to watch videos. Instead, they want to create them. That’s where adding a React Native video editor becomes a game changer. You’re giving users the tools to express, share, and personalize without leaving your app.
Of course, building a video editor from scratch is ambitious. However, between native video processing, UI timelines, exporting, and native dependencies it gets complicated fast. That’s why developers often use:
- Commercial SDKs like Banuba, IMG.LY
- Open-source libraries like react-native-ffmpeg (video processing), react-native-skia (advanced UI)
- Media selection tools like expo-image-picker: Plus, many devs reach for React Native video editor libraries. These libraries bridge the React frontend with native modules that handle the heavy lifting, like video decoding, rendering, and effects seamlessly.
While these tools significantly reduce development effort, they also introduce native configuration steps. Video SDKs often require platform-specific setup, permission handling, and build configuration. Relying on official documentation helps ensure these steps are completed correctly and saves hours of debugging.
And it’s not just about power but about the React Native video editor UI that feels delightful to use. What should that include?
- A drag-and-drop timeline editor
- A device-integrated media library picker
- Previews of filters and AR effects
- Music overlays and audio trimming tools
- Real-time previews and clear export options
By using a proven video SDK React Native, your app can lead that future instead of falling behind it.
A Modular Approach to Building Video Editors in React Native
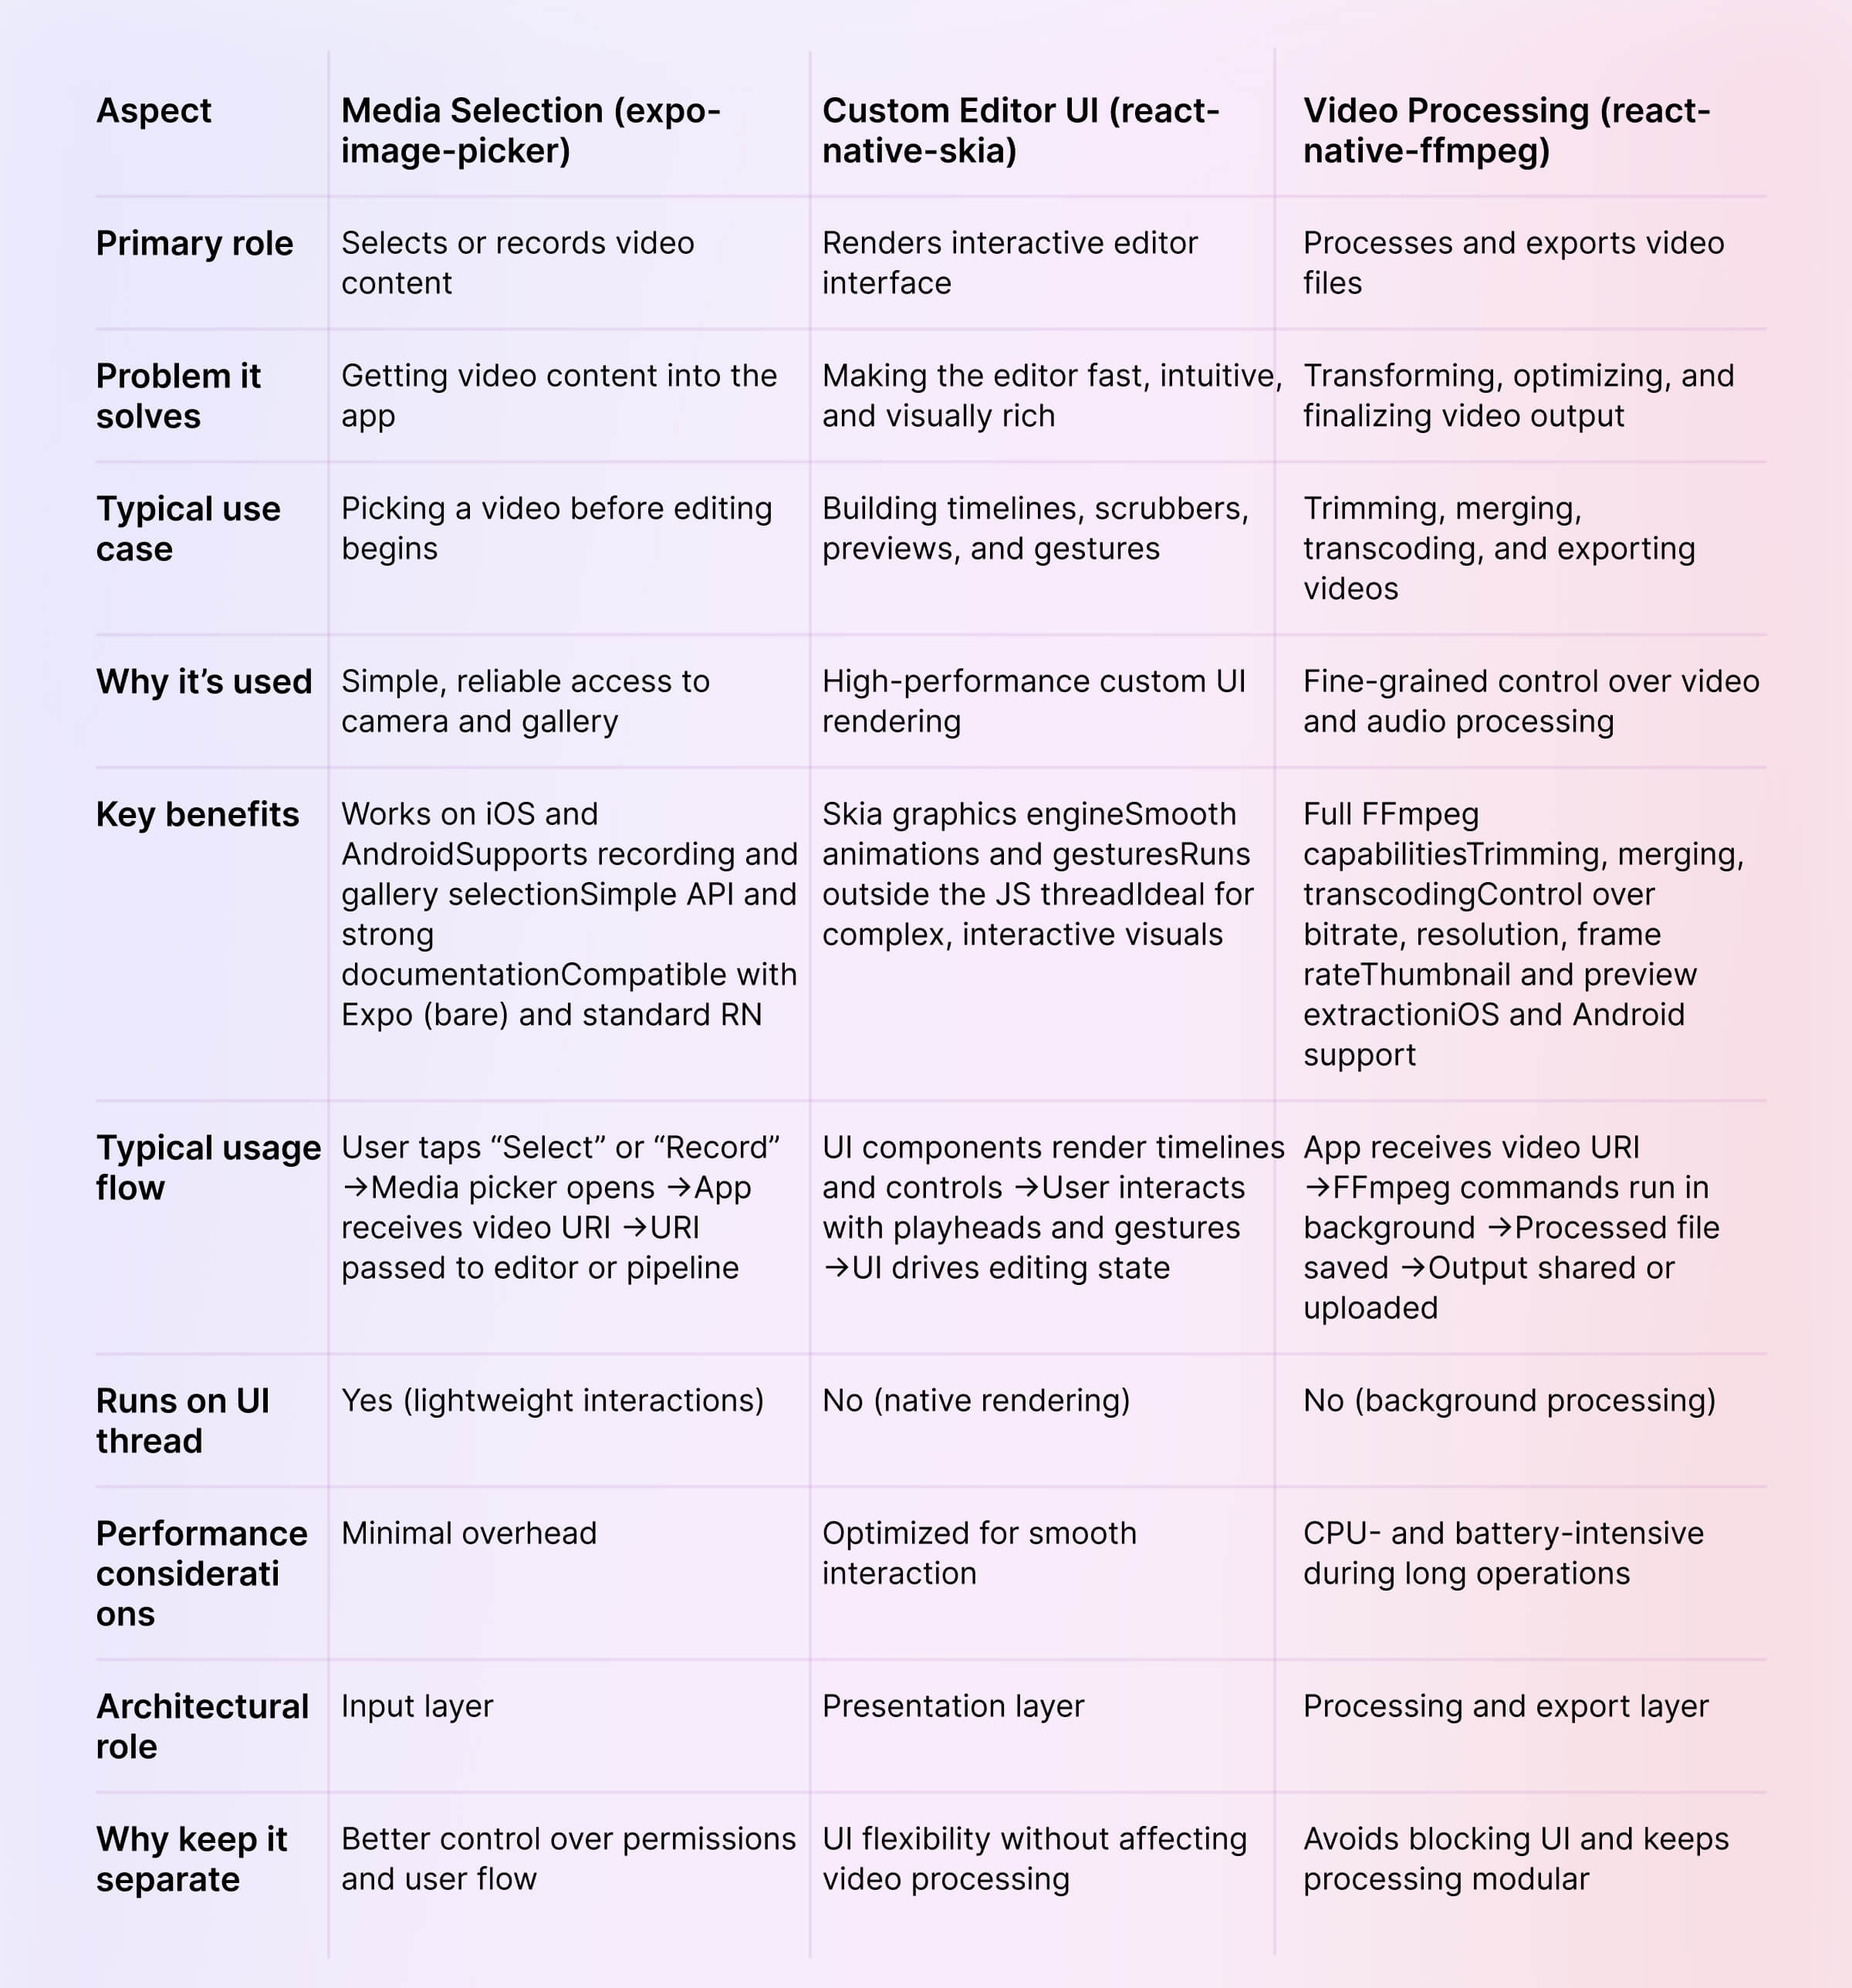
Each layer in this architecture typically requires changes to platform configuration files. On Android, this includes build.gradle and AndroidManifest.xml, while on iOS it involves Info.plist and Podfile updates. These files define permissions, SDK dependencies, and platform requirements necessary for proper video editing functionality.
Inside Banuba React Native Video Editor SDK
“We built this SDK not just for performance, but for creativity. Our goal was to give React Native developers a toolset that feels effortless and empowers users to edit without limits.” — Elena K., Senior Product Engineer at Banuba
More than a basic kit, Banuba Video Editor SDK offers a complete suite of features optimized for performance. It's a robust solution for integrating advanced video editing into any React Native app.
Here’s what sets this React Native video editor SDK apart:
-
Timeline that feels native.
Banuba’s timeline gives users total creative control. No lag, no frustration—just seamless editing across Android and iOS.
-
Powerful video & audio processing.
Banuba Video Editor SDK takes care of the tough stuff: real-time rendering, fast encoding, and perfect audio sync. This way, users can focus on creating instead of endlessly waiting for the final result.
-
Filters, effects, and overlays.
Banuba React Native SDK equips your app with high-performance visual effects, from filters and transitions to AR and beautification tools. All effects render in real time and respond instantly, keeping the editing process fast and fluid. Moreover, adding and tuning them is simple thanks to their design and thorough documentation.
-
Cross-platform support.
Build it once, and it just works on both iOS and Android. The video SDK React Native uses a shared integration layer to keep your codebase tidy and your users happy on any device.
-
Easy integration into any React Native app.
Banuba’s SDK was designed with developers in mind. Banuba offers docs, prebuilt UI, and React Native support straight out of the box. - Flexible pricing. The license cost depends on the number of monthly active users, the exact feature set, and the number of supported platforms. As a result, even a mid-sized company can afford it.
- Small size. When integrated, Banuba Video Editor SDK only adds about 30 Mb to the app download size.
Want to see it in action?
Try the demo app on Google Play and explore what Banuba Video Editor SDK can really do.

So, How Do You Add It to Your React Native App?
Let’s get practical. If you’re like most devs, you don’t want a 10-step guide. You want something that works quickly.
Here’s the short version:
Step 1. Get your Banuba trial token
To begin the free trial of the SDK and gain all the React Native video processing benefits for your app, start with getting a unique trial token. It offers a 14-day free trial with unlimited SDK features.
Step 2. Install the Banuba React Native SDK
This involves adding the Banuba package to your React Native project.
2.1. Verify dependencies:
Is your project running the right versions? Making sure everything is aligned now will save time later.
- Yarn: 3.6.1 or higher (or npm equivalent)
- React Native: 0.74.2 or higher
- Android: API Level 23 (Android 6.0) or higher
- iOS: iOS 14.0 or higher
You can check your React Native version in your package.json file. Update if necessary.
2.2. Install the package:
Head to your project’s main folder in the terminal, then try one of these commands:
Using npm:
[code]
Bash
npm install react-native-banuba-sdk
[/code]
Using Yarn:
[code]
Bash
yarn add react-native-banuba-sdk
[/code]
2.3. Install Pods (iOS Specific):
After installing the npm/yarn package, you need to install the native iOS dependencies (CocoaPods).
[code]
Bash
cd ios
pod install
cd .. # Go back to your project root
[/code]
Having issues with pod install? Run pod deintegrate, then pod install again. Also, double-check that your Podfile includes all necessary entries—Banuba’s install script typically handles this for recent React Native versions.
Step 3: Setting up native dependencies (project configuration)
This is often the most critical and platform-specific part. The SDK usually has native code that needs proper linking and configuration. Modern React Native versions (0.60+) use autolinking, which simplifies this, but some manual steps might still be required by Banuba.
3.1. Android Setup:
- android/build.gradle (project level):
You might need to add Banuba's Maven repository.
[code]
Gradle
allprojects {
repositories {
google()
mavenCentral()
// Add Banuba's Maven repository if specified in their docs
// For example:
maven { url 'https://artifactory.banuba.com/artifactory/banuba-maven-release/' }
}
[/code]
android/app/build.gradle (App Level):
Minimum SDK Version: Ensure your minSdkVersion matches Banuba's requirement (e.g., minSdkVersion 23).
Java 8 Compatibility:
[code]
Gradle
android {
// ...
compileOptions {
sourceCompatibility JavaVersion.VERSION_1_8
targetCompatibility JavaVersion.VERSION_1_8
}
kotlinOptions {
jvmTarget = '1.8'
}
// ...
}
[/code]
Packaging Options: Sometimes, large SDKs require specific packagingOptions.
[code]
Gradle
android {
// ...
packagingOptions {
pickFirst 'lib/arm64-v8a/libc++_shared.so'
pickFirst 'lib/armeabi-v7a/libc++_shared.so'
pickFirst 'lib/x86/libc++_shared.so'
pickFirst 'lib/x86_64/libc++_shared.so'
}
// ...
}
[/code]
Permissions: You will likely need camera, microphone, and storage permissions in AndroidManifest.xml. While the SDK might request them at runtime, declaring them is good practice.
2. android/app/src/main/AndroidManifest.xml:
XML
[code]
<manifest xmlns:android="http://schemas.android.com/apk/res/android"
package="com.yourapp">
<uses-permission android:name="android.permission.CAMERA"/>
<uses-permission android:name="android.permission.RECORD_AUDIO"/>
<uses-permission android:name="android.permission.WRITE_EXTERNAL_STORAGE" android:maxSdkVersion="28" />
<uses-permission android:name="android.permission.READ_EXTERNAL_STORAGE" />
<application
android:requestLegacyExternalStorage="true" >
</application>
</manifest>
[/code]
3.2. iOS Setup:
- ios/Podfile:
- Ensure your platform :ios, '14.0' (or higher) is set.
- Banuba might require specific post-install hooks or flags, check their documentation.
- Info.plist: You'll need to add privacy descriptions for camera, microphone, and photo library access.
XML
[code]
<key>NSCameraUsageDescription</key>
<string>This app needs access to your camera to capture videos.</string>
<key>NSMicrophoneUsageDescription</key>
<string>This app needs access to your microphone to record audio for videos.</string>
<key>NSPhotoLibraryUsageDescription</key>
<string>This app needs access to your photo library to select and save videos.</string>
<key>NSPhotoLibraryAddUsageDescription</key>
<string>This app needs to save edited videos to your photo library.</string>
[/code]
Xcode Project Settings:
- Build Settings: Sometimes specific HEADER_SEARCH_PATHS or FRAMEWORK_SEARCH_PATHS are needed.
- Capabilities: Ensure that required capabilities like "Background Modes" (if video processing happens in background) are enabled, though less common for a simple editor.
Step 4: Add the video editor React component to your app
This is where you integrate the Banuba SDK into your React Native JavaScript code.
4.1. Initialize the SDK: The Banuba SDK needs to be initialized with your token, usually once when the app starts or when the component that uses the editor mounts.
[code]
JavaScript
// App.js or a dedicated BanubaService.js
import { Platform, Alert } from 'react-native';
// This import path is illustrative. Check Banuba's docs for the exact path.
import BanubaVideoEditor from 'react-native-banuba-sdk';
// IMPORTANT: Replace with your actual Banuba Token!
const BANUBA_CLIENT_TOKEN = "YOUR_UNIQUE_BANUBA_TRIAL_TOKEN";
export const initializeBanubaSDK = async () => {
try {
// This is a placeholder for Banuba's specific initialization method.
// It might return a boolean indicating success.
const isInitialized = await BanubaVideoEditor.initialize(BANUBA_CLIENT_TOKEN);
if (isInitialized) {
console.log("Banuba SDK initialized successfully!");
return true;
} else {
console.error("Banuba SDK failed to initialize.");
Alert.alert("Initialization Failed", "Could not initialize video editor. Please check your token.");
return false;
}
} catch (error) {
console.error("Error during Banuba SDK initialization:", error);
Alert.alert("Error", "An error occurred while setting up the video editor.");
return false;
}
};
// You might also have a deinitialization function for cleanup
export const deinitializeBanubaSDK = async () => {
try {
await BanubaVideoEditor.deinitialize(); // Placeholder method
console.log("Banuba SDK deinitialized.");
} catch (error) {
console.error("Error deinitializing Banuba SDK:", error);
}
};
[/code]
4.2. Create a component to launch the editor: This component will handle the logic for opening the Banuba video editor SDK and processing its results.
[code]
JavaScript
// screens/VideoEditorScreen.js (or any component where you want the editor)
import React, { useState, useEffect } from 'react';
import { View, Button, Text, ActivityIndicator, Alert } from 'react-native';
import { initializeBanubaSDK, deinitializeBanubaSDK } from '../services/BanubaService'; // Assuming you put init logic here
// Again, placeholder import.
import BanubaVideoEditor from 'react-native-banuba-sdk';
const VideoEditorScreen = () => {
const [sdkReady, setSdkReady] = useState(false);
const [editingResult, setEditingResult] = useState(null);
const [loading, setLoading] = useState(true);
useEffect(() => {
const setupSdk = async () => {
const success = await initializeBanubaSDK();
setSdkReady(success);
setLoading(false);
};
setupSdk();
return () => {
// Deinitialize SDK when component unmounts if needed
// deinitializeBanubaSDK();
};
}, []);
const openBanubaEditor = async () => {
if (!sdkReady) {
Alert.alert("Editor Not Ready", "Please wait while the video editor initializes.");
return;
}
try {
setLoading(true);
// This is the core call to open the Banuba Video Editor UI.
// The options object is crucial for customization (initial video, enabled features).
// Consult Banuba's documentation for all available options.
const result = await BanubaVideoEditor.openVideoEditor({
// Example options:
// entryPoint: 'camera', // 'camera' or 'gallery' or 'editor' (if opening existing video)
// initialVideoUri: 'file:///path/to/my/video.mp4', // To edit an existing video
// enableGallery: true,
// enableCamera: true,
// enableMusicEditor: true,
// enableFilterEditor: true,
// exportQuality: 'high',
// audioVolume: 0.8,
// watermarkEnabled: false, // If your license allows
// ... many more customization options
});
if (result && result.exportedVideoUri) {
console.log("Video edited successfully! Path:", result.exportedVideoUri);
setEditingResult(`Edited video saved to: ${result.exportedVideoUri}`);
Alert.alert("Success", "Video has been edited and saved!");
// You can now upload this video, display it, etc.
} else if (result && result.cancelled) {
console.log("Video editing was cancelled.");
setEditingResult("Video editing cancelled by user.");
} else {
console.warn("Video editor closed without a specific result.");
setEditingResult("Video editor session ended.");
}
} catch (error) {
console.error("Failed to open Banuba Video Editor:", error);
Alert.alert("Error", "Could not open video editor.");
} finally {
setLoading(false);
}
};
if (loading) {
return (
<View style=>
<ActivityIndicator size="large" color="#0000ff" />
<Text style=>{sdkReady ? "Launching Editor..." : "Initializing Banuba SDK..."}</Text>
</View>
);
}
return (
<View style=>
<Text style=>
Integrate Banuba Video Editor
</Text>
{sdkReady ? (
<Button
title="Open Video Editor"
onPress={openBanubaEditor}
disabled={loading}
/>
) : (
<Text style=>
SDK not ready. Check your token and console for errors.
</Text>
)}
{editingResult && (
<View style=>
<Text style=>Last Editor Result:</Text>
<Text style=>{editingResult}</Text>
{/* You could add a <Video> component here to play the edited file */}
{/* Example: <Video source= style= /> */}
</View>
)}
</View
);
};
export default VideoEditorScreen;
[/code]
Step 5: Run your application
After all these steps, rebuild your application to ensure all native modules are properly linked.
[code]
Bash
# Clean caches (good practice)
npm start -- --reset-cache # or yarn start -- --reset-cache
cd ios && pod install && cd .. # Re-run pod install if you changed Podfile
npx react-native run-android
npx react-native run-ios
[/code]
Follow these steps and explore Banuba's official resources to easily integrate the video editor SDK into your React Native project. And if you're still not sure about anything, address the developer portal to connect with our Support Team or fellow developers. Plus, you can find some video editor SDK examples and guides here.
Conceptual React Native Video Editor Example: A Simple Video Editor with Banuba SDK
Picture a React Native app where users can shoot fun videos or grab one from their phone, add cool filters, trim the parts they don’t want, and then save or share the finished cut.
App name: "MySimpleVid"
Core features:
- Video selection/recording: Allow users to choose existing videos or record new ones.
- Basic timeline editing: Trim the video's start and end points.
- Effects/filters: Apply a visual filter to the video.
- Video processing & export: Save the edited video.
Technologies:
- React Native
Banuba Video Editor SDK
User Flow & Banuba SDK Involvement

Phase 1: Editor Launch & Initial Video Selection
User Action:
The user taps the “Edit Video” button on the main screen of your React Native app.
App Behavior (React Native):
- The app checks if the Banuba SDK is initialized (sdkReady state).
- If ready, it calls BanubaVideoEditor.openVideoEditor() with appropriate parameters.
Banuba SDK Options:
[code]
{
entryPoint: 'camera' | 'gallery',
enableGallery: true,
enableCamera: true
}
[/code]
SDK UI Response:
- If entryPoint: 'gallery', a media picker opens.
- If entryPoint: 'camera', the in-app camera launches for recording.
Outcome:
The editor supports both media selection from the device and real-time video capture via the integrated camera module.
Phase 2: Timeline & Trimming Interface
User Action:
After choosing or recording a video, the editor transitions to the timeline view.
Banuba Editor UI:
- Top: Video preview player.
- Bottom: Interactive timeline with draggable start/end handles.
User Interactions:
- Adjust trim points by dragging the handles.
- The video preview updates in real-time to reflect changes.
SDK Functionality (Under the Hood):
- Real-time trimming is handled by Banuba's native video engine.
- Frames are dynamically re-rendered based on trim points for smooth playback without lag.
Phase 3: Applying Filters & Effects
User Action:
The user taps the “Filters” or “Effects” icon.
Banuba Editor UI:
- A horizontal scroll or grid layout of effect thumbnails appears.
- Tapping on any effect applies it immediately to the preview.
Features:
- Real-time effect rendering.
- Categorized filters: e.g., Color, Artistic, AR Masks.
- AR filters use face tracking and overlay 3D/2D assets using computer vision.
SDK Role:
- Applies filters frame-by-frame in real-time.
- Integrates effects seamlessly with trimmed video portions.
Phase 4: Exporting the Final Video
User Action:
Once editing is done, the user taps “Done” or “Export.”
Banuba SDK UI:
- A progress indicator appears while the video is processed.
SDK Processing Tasks:
- Encoding: Converts edits into a final video (e.g., MP4).
- Edits Merge: Applies trims, effects, and filters permanently.
- Audio Sync: Keeps sound aligned with video content.
- Optimization: Uses hardware acceleration where available.
Result:
- SDK returns control to React Native.
- The returned result includes the final video path (e.g., exportedVideoUri).
App Logic (React Native):
- Use the URI to:
- Upload to a backend/server.
- Show in a custom player.
- Save to gallery (using modules like react-native-fs or react-native-camera-roll).
- Navigate to a sharing screen.
Integration
CLI (React Native)
Setting up the Banuba SDK in a plain React Native app is fast and straightforward:
Install the SDK:
[code]
npm install react-native-banuba-sdk
# or
yarn add react-native-banuba-sdk
[/code]
2. For iOS, install CocoaPods:
[code]
cd ios
pod install
cd ..
[/code]
3. Update native project settings:
Android: Add required permissions and SDK details to build.gradle
iOS: Update Info.plist with permissions and set minimum platform version
For full details, check Banuba’s requirements and GitHub repo.
Expo Integration
Using Expo with the bare workflow? Banuba SDK has you covered.
1. Install via Expo CLI:
[code]
expo install react-native-banuba-sdk
[/code]
2. Use the Banuba Expo Config Plugin by adding it to your app.json or app.config.js:
[code]
{
"expo": {
"plugins": [
"react-native-banuba-sdk"
],
...
}
}
[/code]
3. Add required permissions:
[code]
{
"expo": {
"android": {
"permissions": [
"CAMERA",
"RECORD_AUDIO",
"READ_EXTERNAL_STORAGE",
"WRITE_EXTERNAL_STORAGE"
]
},
"ios": {
"infoPlist": {
"NSCameraUsageDescription": "This app needs access to your camera to capture videos.",
"NSMicrophoneUsageDescription": "This app needs access to your microphone to record audio.",
"NSPhotoLibraryUsageDescription": "This app needs access to your photo library to select and save videos.",
"NSPhotoLibraryAddUsageDescription": "This app needs to save edited videos to your photo library."
}
}
}
}
[/code]
4. Rebuild your app:
[code]
expo prebuild
expo run:ios
expo run:android
[/code]
Configuration & Customization
Banuba SDK lets you fully customize the editor’s tool layout, theme, and features using a simple config object.
Example: Configuring Toolbar Tools & Theme (TypeScript)
[code]
import BanubaVideoEditor from 'react-native-banuba-sdk';
const editorConfig = {
toolsOrder: ['trim', 'filters', 'stickers', 'music'],
theme: {
primaryColor: '#FF6347',
secondaryColor: '#333',
backgroundColor: '#FFF',
fontFamily: 'Arial',
},
enableFilters: true,
enableMusicEditor: true,
enableAnnotations: true,
overlayImages: ['sticker1.png', 'sticker2.png'],
};
BanubaVideoEditor.openVideoEditor(editorConfig)
.then(result => {
if (result.exportedVideoUri) {
console.log('Video saved at:', result.exportedVideoUri);
}
})
.catch(console.error);
[/code]
Change Tool Order & Enable/Disable Features
[code]
const config = {
toolsOrder: ['filters', 'trim', 'music'], // reorder toolbar buttons
enableTextOverlay: false, // hide text tool
enableARMasks: true, // enable AR masks
};
[/code]
Filters
Banuba includes real-time filter previews and AR filters. You can customize which filter sets appear.
[code]
const filterConfig = {
filterCategories: [
{ id: 'color', name: 'Color Filters' },
{ id: 'artistic', name: 'Artistic' },
{ id: 'ar_masks', name: 'AR Masks' },
],
};
BanubaVideoEditor.openVideoEditor({
...editorConfig,
filterConfig,
});
[/code]
Overlays
Add overlay images or stickers your users can place on videos.
[code]
const overlayConfig = {
overlayImages: [
{ id: 'sticker1', uri: 'file:///path/to/sticker1.png' },
{ id: 'sticker2', uri: 'file:///path/to/sticker2.png' },
],
};
BanubaVideoEditor.openVideoEditor({
...editorConfig,
...overlayConfig,
});
[/code]
Annotations
Support for freehand drawing, stickers, and text annotations.
[code]
const annotationConfig = {
enableAnnotations: true,
brushColors: ['#FF0000', '#00FF00', '#0000FF'],
stickerPacks: ['pack1', 'pack2'],
};
BanubaVideoEditor.openVideoEditor({
...editorConfig,
...annotationConfig,
});
[/code]
Native Interface Bridge
Need deeper native-level customization? Banuba exposes native interfaces on both platforms.
iOS (Objective-C)
[code]
#import <RNVideoEditor/RNVideoEditor.h>
- (void)configureBanubaEditor {
RNVideoEditorBuilder *builder = [RNVideoEditorBuilder new];
builder.theme = [RNVideoEditorTheme defaultTheme];
builder.toolsOrder = @[@"trim", @"filters", @"stickers"];
// Additional configuration here
[RNVideoEditor configureWithBuilder:builder];
}
[/code]
Android (Kotlin)
[code]
RNVideoEditorModule.editorWillOpenClosure = { editorSettings ->
editorSettings.toolsOrder = listOf("filters", "trim", "music")
editorSettings.theme.primaryColor = Color.parseColor("#FF6347")
// Customize more editorSettings here
}
[/code]
How It Works Under the Hood
 Background replacement in Banuba Video Editor SDK
Banuba’s SDK uses a native-JavaScript bridge architecture:
-
The native layer (Swift/Objective-C for iOS, Kotlin/Java for Android) handles video processing, effects, and rendering at high speed.
-
The JavaScript layer provides the UI and triggers events via the React Native bridge.
-
This combo delivers native-level performance without blocking your JS thread.
-
You keep your codebase clean and React Native-driven while still getting serious processing power.
Why Use Banuba’s Video SDK for React Native Apps?
Banuba’s React Native Video Editor SDK is built to simplify development while delivering a premium user experience. Whether you're building a content creation platform, social video app, or any feature that involves editing, Banuba helps you launch faster and smarter.
- Time-saving integration for developers
Banuba takes the grunt work out of video editor integration. The UI’s already there, the docs are clear, and it plays nicely with React Native. You’ll save hours (maybe even days) getting things production-ready.
-
High-performance video processing
Built for speed and precision, Banuba’s video SDK brings native performance to your React Native app. It handles real-time editing and synced audio flawlessly, ensuring a high-end experience—even on budget devices.
-
Enhanced user experience
Powerful effects, simple design. Banuba’s React Native video editor combines filters, virtual backgrounds, AR, responsive controls, and beyond for pro-looking videos in just a few taps.
Final Thoughts
If your app deals with video and you're using React Native, adding an editor isn’t just a nice-to-have. It’s becoming table stakes.
With Banuba’s Video Editor SDK, you don’t need to become a media processing expert. You just plug in a well-designed, fast, feature-rich editor and get on with building the rest of your app.
Give it a spin by starting the Video Editor SDK free trial now.
Related Resources
- Explore the Banuba Video Editor SDK
- Test the Banuba Video Editor SDK demo app
- Explore the full React Native video editor integration sample on GitHub
- Watch video guides for integration:
Reference List
Adavelli, M. (2024, January 2). Top Video Consumption Statistics of 2025. TechJury - Tech Insights, Reports And Analysis. https://techjury.net/industry-analysis/video-consumption-statistics/#:~:text=91.8%25%20of%20all%20internet%20users%20watch%20online%20videos%20weekly.&text=In%20this%20digital%20age%2C%20everyone,to%20influencer%20videos%20to%20gaming.
Aulas, C. (2025, June 13). 5 Best React Native Video Player Libraries (2025). https://www.banuba.com/blog/best-react-native-video-player-libraries
Background Subtraction with Deep Learning | Detection, Removal. (n.d.). https://www.banuba.com/technology/background-subtraction
Banuba. (2022a, June 21). How to integrate Banuba Video Editor SDK into an Android application [Video]. YouTube. https://www.youtube.com/watch?v=xSMK3gCfRJY
Banuba. (2022b, June 21). How to integrate Banuba Video Editor SDK into an iOS application [Video]. YouTube. https://www.youtube.com/watch?v=2FsEm_W01to
Banuba. (2022c, August 18). How to develop a mobile video editor app. https://www.banuba.com/blog/how-to-develop-a-mobile-video-editor-app
Banuba. (2022d, August 18). How to develop a mobile video editor app. https://www.banuba.com/blog/how-to-develop-a-mobile-video-editor-app
Banuba Community Portal. (n.d.). Banuba Community Portal. https://community.banuba.com/
Banuba Video Editor - Apps on Google Play. (n.d.). https://play.google.com/store/apps/details?id=com.banuba.sdk.ve.demo&hl=en
Team, B. (n.d.-a). AI Video Editor SDK API for Android, IOS. https://www.banuba.com/video-editor-sdk
Team, B. (n.d.-b). AI Video Editor SDK API for Android, IOS. https://www.banuba.com/video-editor-sdk
Video Editor SDK - Examples and guides. (2023, June 22). Banuba Community Portal. https://community.banuba.com/t/video-editor-sdk-examples-and-guides/33
Whitney, M., & Whitney, M. (2021, December 2). 6 ways to use video to increase conversion rates. WordStream. https://www.wordstream.com/blog/ws/2016/03/30/video-for-conversion-rate-optimization#:~:text=Remember%2C%20videos%20have%20been%20proven%20to%20increase%20conversion%20rates%20by%2080%.
-
Yes. Banuba offers seamless React Native support through a dedicated bridge, allowing you to integrate advanced native video editing capabilities while maintaining a unified React Native codebase for iOS and Android.
-
Video editing with Banuba in React Native feels simple, but there’s a lot going on under the hood. You call functions from your JavaScript code, and the SDK passes those actions to native modules, which handle everything from rendering to encoding. This setup ensures fast performance and smooth editing—even on mid-range phones.
-
Totally. Banuba’s SDK gives you a solid editor to start with, but you’re not locked into it. Want to change the theme? Remove some tools? Add your own filters or effects? You can do all of that. It’s made to be adapted—so you can keep things on-brand without building everything from scratch.

