[navigation]
About Unity Camera Filters
There are a lot of different effects that you can add:
- Color filters (LUTs). Pioneered by Instagram, these include monochrome, Clarendon, and other effects that change the entire color scheme of the image or video.
- Masks/stickers. Three-dimensional and two-dimensional objects placed on a person’s face.
- Virtual backgrounds. Replacing everything but the person with an image, GIF, video, or a 3D environment.
- Touch-up. Removing skin imperfections, smoothening wrinkles, whitening teeth, and other similar effects.
- Facial feature editing (face morphing). Resizing and reshaping eyes, nose, lips, and other parts of the face.
- AR try-on. Unity camera filters realistically simulating eyeglasses, hats, makeup, and other items. They can be tried like the real things.
- Avatars. 3D characters that copy the facial expressions and movements of the user. They can be photorealistic, cartoonish, or something else entirely.
- Triggers. Interactive effects that start playing when the user does something – yawns, gives a thumbs-up, etc.

Use Cases
Unity camera filters can be helpful in many types of applications:
- eCommerce. Testing products virtually in a 3D environment simulates the brick-and-mortar shopping experience while being more convenient and hygienic.
- eLearning. Showing learning aids (e.g. anatomical features) overlaid on a person, replacing the backgrounds with other planets, or adding other interactive educational content.
- Dating. Face filters improve user retention and user experience in dating apps.
- Games. Facial expressions can be used to control the game characters, and filters can be in-game items.
- Video conferencing. Replacing a messy room with a professional environment and eliminating camera distortions with face touch-up are expected features in any modern video calling app.
How to implement Unity camera filters
Now let’s dive into the instructions. We will be using Banuba Face AR SDK for this purpose, as it contains all the features listed above, and we have the most experience with it.
1. Get the SDK and the trial token
You can try the filters for free over 14 days. This is enough to see how well they fit your application.
To start, send us a message via the contact form.
You will receive an email with the SDK archive, along with the instructions on how to integrate it into your application. This step also works for other Banuba products, including AR Cloud – a web-based storage from which your users can download effects on-demand and save space on their device.
2. Integrating the Banuba plugin for Unity
Start by placing the token in the following location: Assets/BanubaFaceAR/BaseAssets/Resources/BanubaClientToken.txt.
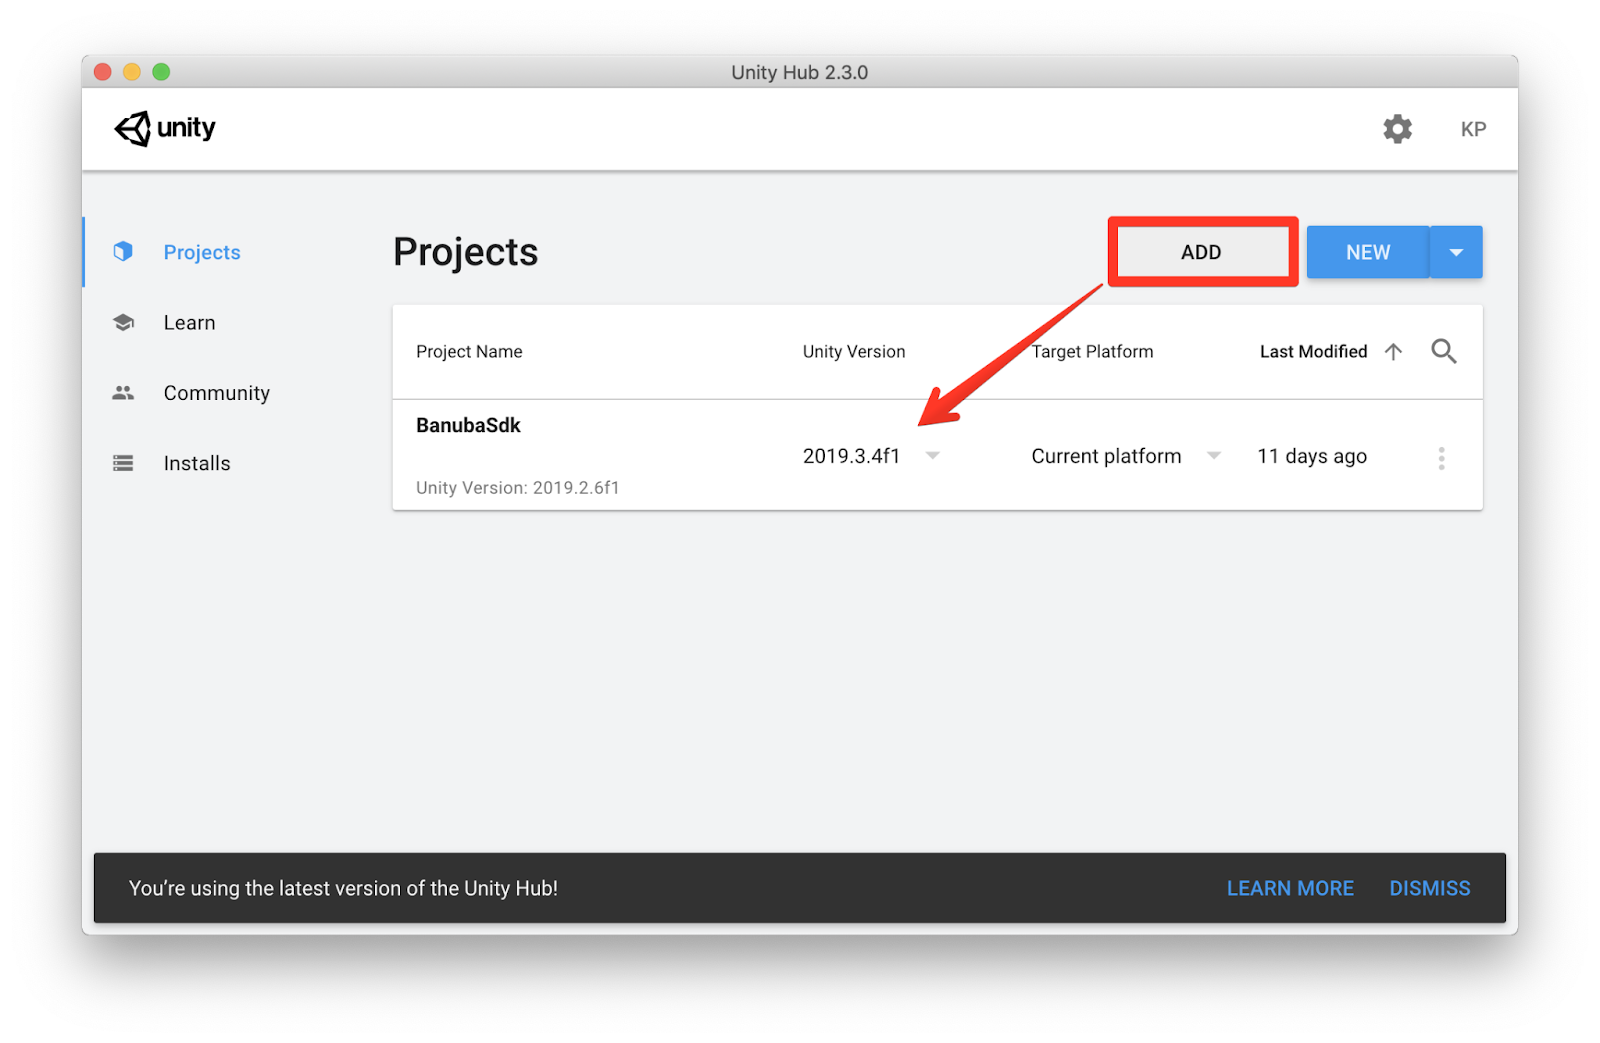
Then run Unity Hub and add the Banuba SDK project that you received in the archive.
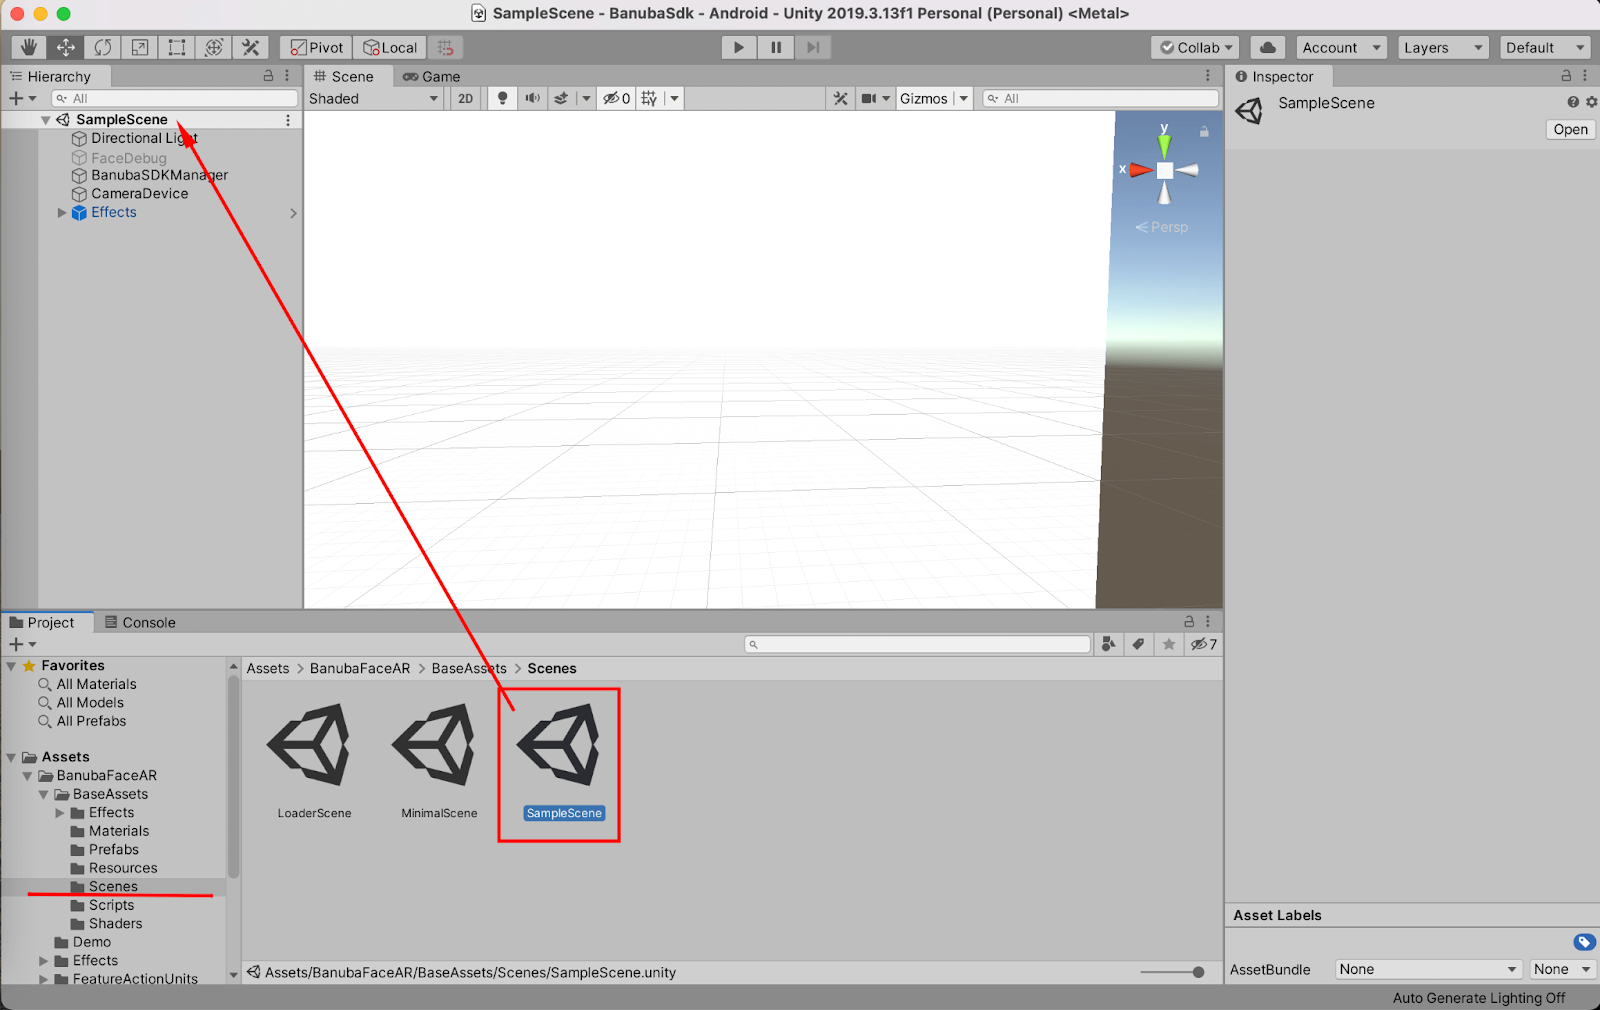
In the project files tree find and open SampleScene.unity under Assets -> BanubaFaceAR -> BaseAssets -> Scenes. Now you should see a sample scene active in the Unity Scene section.
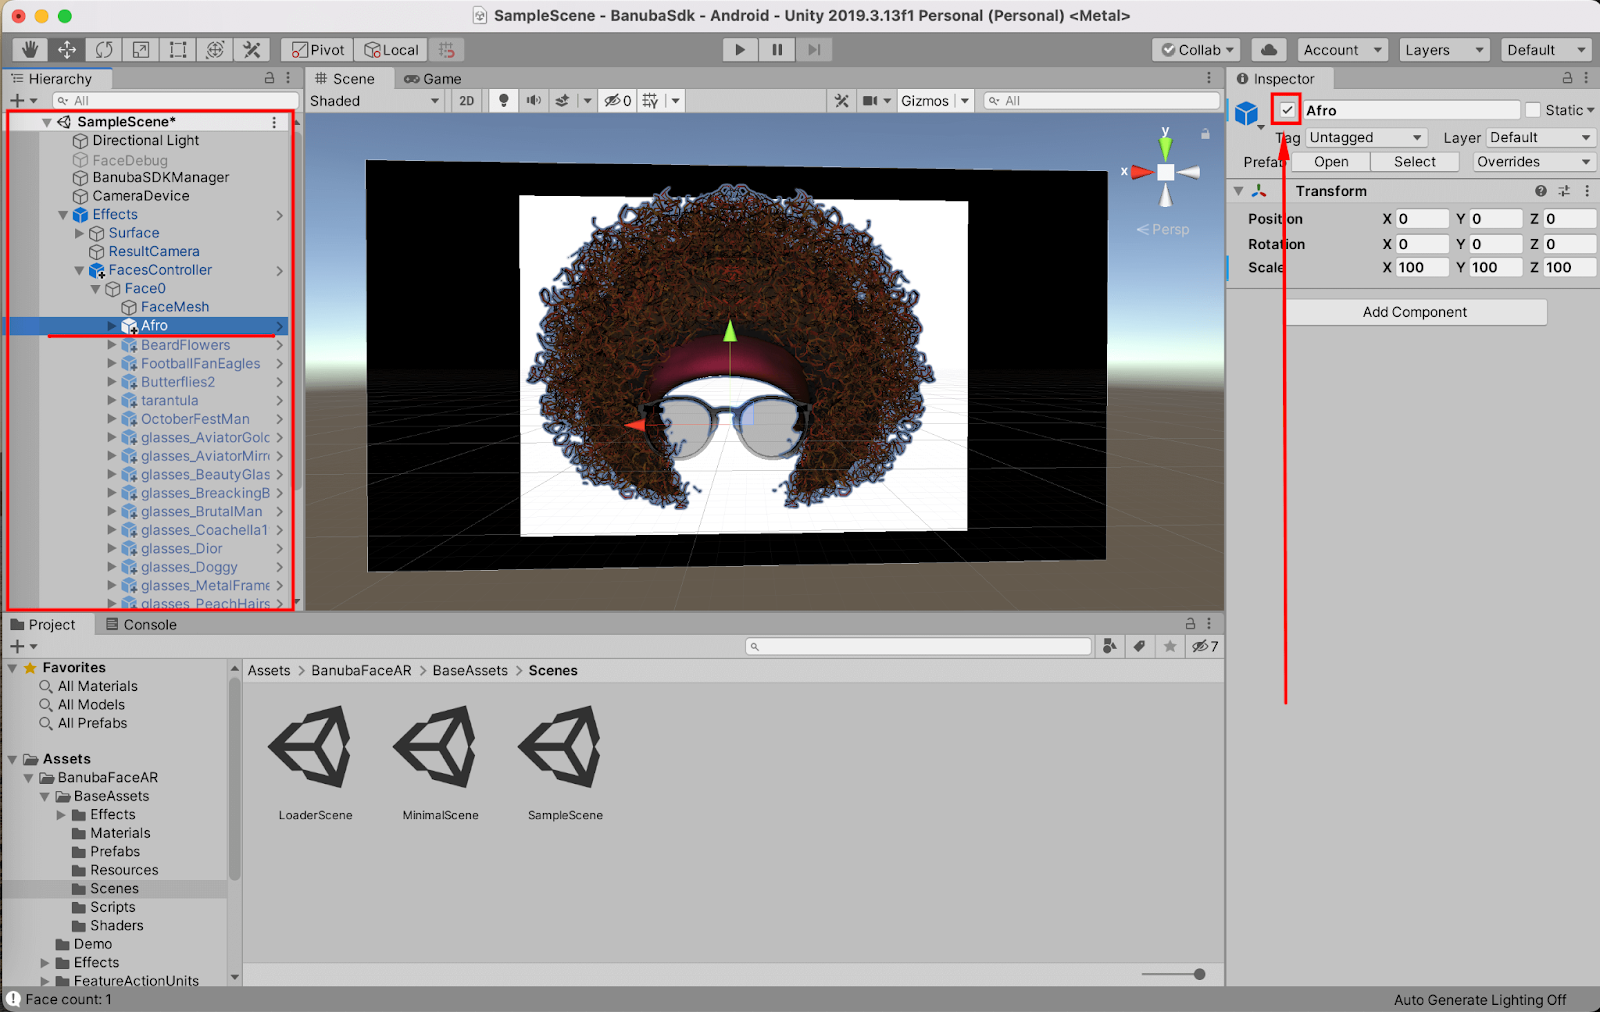
To select a mask, enable the checkbox in the Inspector for the required object. You can find masks in the Hierarchy window under Effects -> FacesController -> Face0 -> FaceMesh.
Finally, click the "Play" button in Unity to check how the SampleScene works on the desktop.
3. Launch
Now you can start the application.
iOS (Unity plugin required)
- In Unity open File -> Build Settings
- Check that both LoaderScene and SampleScene checkboxes are marked and have indexes 0 and 1 respectively
- Select the “iOS platform” in the platforms list in the left column
- Click the "Switch Platform" button
- Once the platform is switched, click "Build And Run" button in the same window
- Specify the location and the name for Unity xCode project
- The project will run automatically if build succeeded OR you can open Unity-iPhone.xcodeproj file from the folder with the generated xCode project
- Sign the project in xCode and launch the app
Android (Unity plugin required)
- In Unity open File -> Build Settings
- Check that both LoaderScene and SampleScene checkboxes are marked and have indexes 0 and 1 respectively
- Select the “Android platform” in the platforms list in the left column
- Click the "Switch Platform" button
- Check that device is updated or click the "Refresh" button
- Once the platform is switched, click the "Build And Run" button in the same window
- Specify the location and the name for Android .apk file
- The .apk will run automatically if the build succeeded OR you can install the generated .apk with adb or directly from your device
MacOS
- In Project window find and select BNBRecognizer.bundle under Assets -> Plugins -> MacOS. Then in Inspector select “Any CPU” in Platform settings -> Mac OS X -> CPU dropbox
- In Unity open File -> Build Settings
- Select the “MacOS” platform in the platforms list in the left column
- Click the "Switch Platform" button
- Once the platform is switched, select Intel 64-bit + Apple silicon in Architecture dropbox and click the "Build" button in the same window
- Specify the location and the name for MacOS executable
Windows
- In Unity open File -> Build Settings
- Select the Windows platform in the platforms list in the left column
- Click the "Switch Platform" button
- Once the platform is switched, click the "Build" button in the same window
- Specify the location and the name for the Windows executable
Conclusion
Unity camera filters are a good way to wow users, increase retention, and make your app stand out from the competition. Using Banuba Face AR SDK, you can quickly get these filters and get your product to market faster.
-
The official technical documentation for Banuba Face AR SDK is available online and includes requirements, setup instructions, and configuration details:
- Banuba Face AR SDK iOS documentation
- Banuba Face AR SDK Android documentation
- Banuba Face AR SDK Flutter documentation
- Banuba Face AR SDK React Native documentation
- Banuba Face AR SDK Web documentation
- Banuba Face AR SDK Unity documentation
- Banuba Face AR SDK Desktop documentation
This Banuba Face AR SDK documentation should be your primary reference during integration.
-
You can access official integration code samples for the Banuba Face AR SDK on GitHub. Banuba provides platform-specific examples to help you integrate faster:
- Banuba Face AR SDK iOS integration code sample
- Banuba Face AR SDK Android integration code sample
- Banuba Face AR SDK Flutter integration code sample
- Banuba Face AR SDK React Native integration code sample
- Banuba Face AR SDK Desktop integration code sample
- Banuba Face AR SDK Web integration code sample
- Banuba Face AR SDK Unity integration code sample
These Banuba Face AR SDK repositories include setup instructions and minimal working examples for quick deployment.
-
Yes. The Banuba Face AR SDK includes an LLM-friendly documentation file designed for AI-assisted development and internal knowledge systems:
This structured Banuba Face AR SDK text file can be used with AI tools to streamline onboarding and developer workflows.
-
The Banuba Face AR SDK provides official cross-platform plugins to simplify integration into hybrid applications:
These Banuba Face AR SDK plugins are maintained by Banuba and support faster implementation for cross-platform apps.