A beauty filter for live streaming is a great way to enhance the broadcast experience by engaging users to stay longer watching a live stream session and making a streamer more confident about their appearance.
You can use it as a standalone filter to enhance the user camera experience or as part of face filters adding animation, virtual accessories, or entertainment masks.
Today, we'll share the ways of creating beauty filters for streaming with Banuba's Effect Construction Tool.

This post will tell you how to create your face beauty filter and configure it with our Effect Constructor. The filter we feature as an example includes the following beautification options:
- Skin smoothing
- Skin tone enhancement
- Face morphing
- Teeth whitening
- Expressive eyes effect
- Eye makeup
- Color improvement.
If you are new to Banuba and you’d like to test Beauty AR SDK, drop us a line via the website contact form, and we’ll be happy to share the trial.

3 Steps to Building a Beauty Filter for Live Streaming
1. Prepare source files
To create a beauty filter for live streaming, you will need 3 types of source files:
-
FBX file with morphing
-
Three textures as PNG files for Makeup, Softlight and Highlight.
-
Three LUT files in PNG format for eyes and teeth whitening and general color improvement.
FBX file with morphing
Morphing allows for modifying the size of the face and its facial features by moving the vertices of the 3D model of the face. You can slim down or enlarge the face, change the shape of the nose, eyes, lips, chin, or produce any other deformations.
 To change the face of the user, you need to create an FBX with a morphed base mask using any 3D editor. Those that have tools for sculpting will be especially useful.
You can use the FaceDefault.FBX file with default face as a base model to create your morphed meshes. In our example, we’ll use slight morphing that slims down the face and the nose to make the user's facial features more delicate.
The images below show the base mask and the morphing effect (green mask) added to the base mask (pink mask). The morphing effect will be applied to the recognized face of the user, while the UV coordinates should remain unchanged.
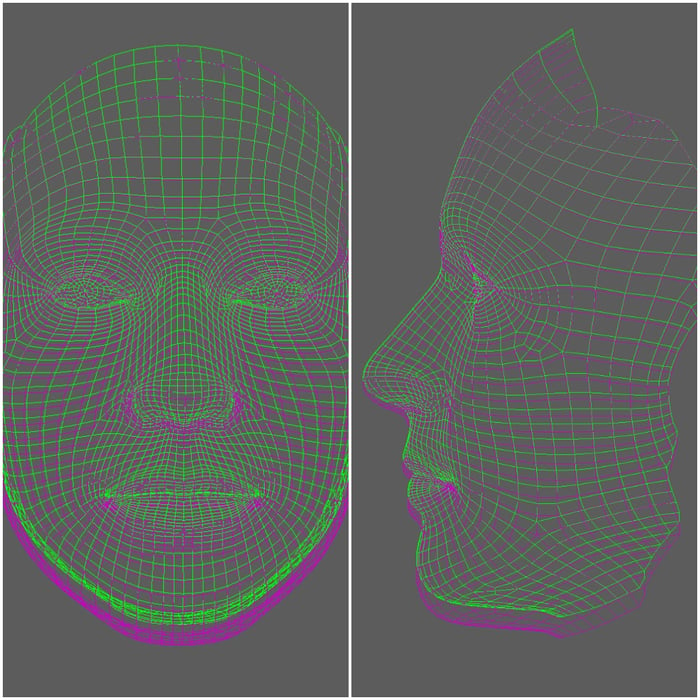 UV coordinates
Textures: Makeup, Softlight, and Highlight
Now we will make three textures as PNG files according to the UV scan grid. These textures make up the core of our face beautification webcam filter.
Makeup texture
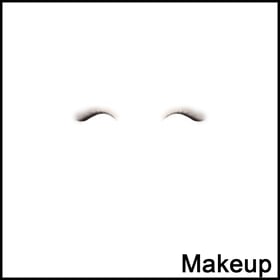 The makeup texture is displayed on the face in normal blending mode using transparency. You can add tattoos, eyebrow color, shadows thrown by other objects (such as glasses), or, as in our case, eye shadow, lashes and eyeliner.
Softlight texture
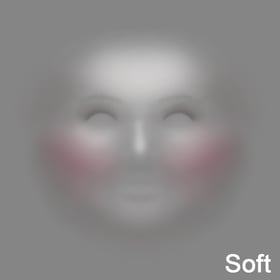 The Softlight texture is displayed on the face in softlight blending mode. It can be used to correct the skin tone, make it lighter or darker. For a skin-smoothing effect, the Softlight texture highlights the prominent areas of the face like the forehead, nose, cheekbones and chin. We also add a rosy tint to the cheeks.
Highlight texture
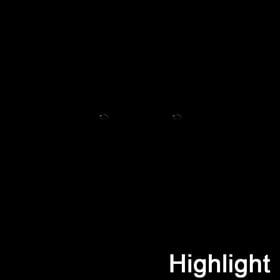 The Highlight texture is displayed on the face in blend mode. In our example, this texture adds glare to the eyes to produce an “expressive eyes” effect.
LUT (Look Up Table)
The LUT files enable the color improvement of the entire beauty webcam filters in full-screen mode. This way beautification will look organic, and the user will enjoy an enhanced, more vivid image. Also, we can whiten the user's eyes and teeth.
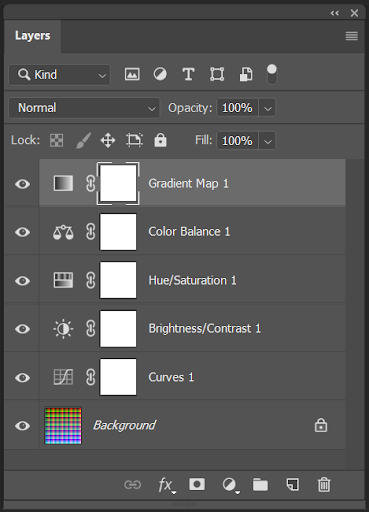
You can make your LUT file by making color improvements of the image in Photoshop using adjustment layers without masks, and applying these layers to the neutral LUT file.
Please note, files for eyes and teeth whitening should be without an alpha channel, and the file name should begin with the lut3d_ prefix.
2. Construct beauty filter with Effect Constructor
Now, as you have all the resources in place, we can construct and configure the beauty webcam filters.
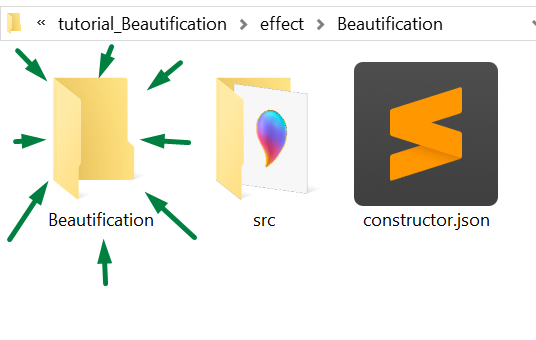
- Create a folder named your effect (“Beautification”).
- Create src folder inside for your source files and put the FBX file with morphing there.
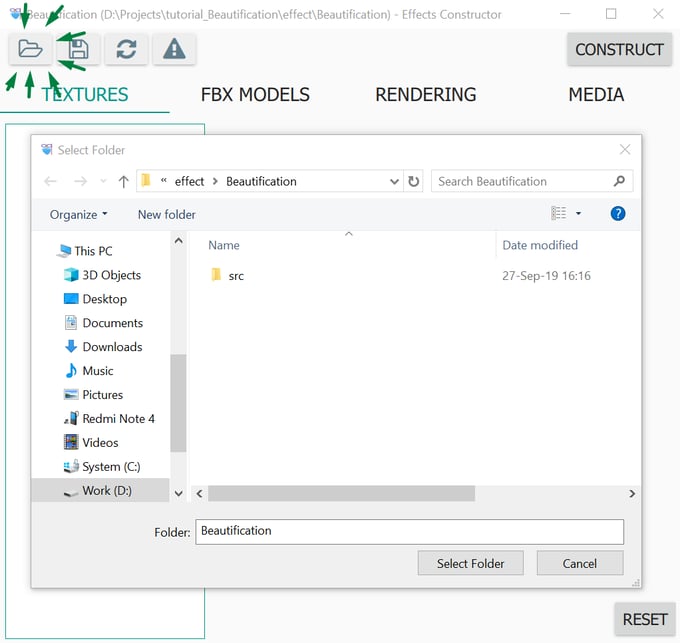
- Launch the Effects Constructor, click the Open button and specify the path to the "Beautification" root folder. This action will generate a new folder with the configured effect.
4. Add source files to this new folder: three LUT files and three PNG files with textures (Softlight, Makeup, and Highlight).
3. Configure face beautification filter
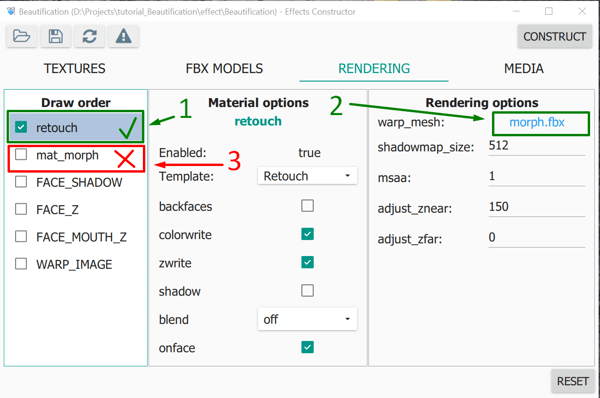
Step 1. Basic settings
In the Effect Constructor, go to the Rendering tab:
- Turn on the retouch layer. We’ll set it up a bit later.
- In the warp_mesh option, point to the file with morphing.
- Disable the mat_morph layer with the morph geometry material as it’s not needed in our face beautification filter.
Click the Construct or Save buttons to save the settings.
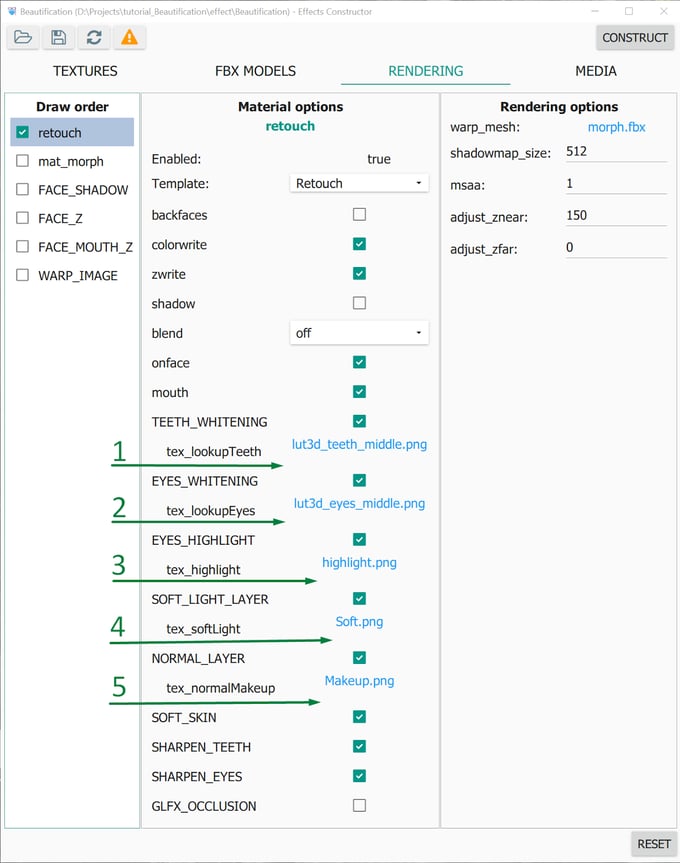
Step 2. Setting up the retouch layer
To set up the retouch layer, specify the necessary options for the files.
-
LUT file for teeth whitening
-
LUT file for eye whitening
-
PNG file with the glare in the eyes
-
Softlight PNG file
-
Makeup PNG File
Click on the Construct button.
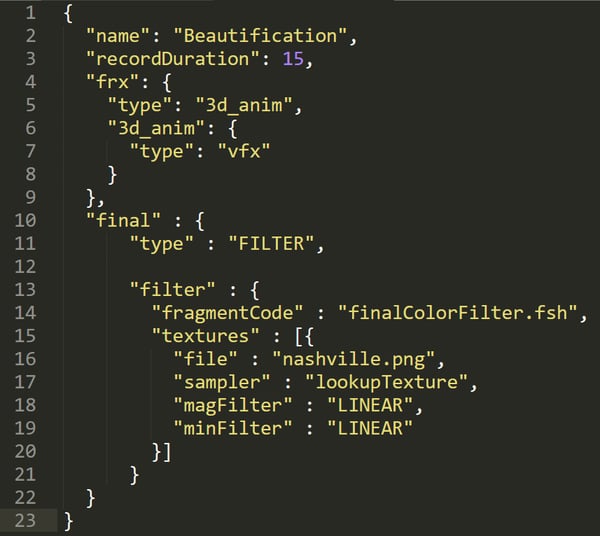
Step 3. Adding color correction
In the final step, we apply the color correction to the entire image to add consistency to our face beauty filter.
Save the finalColorFilter.fsh file to the folder with your constructed effect and insert this code into the config.json file to enable it. In the code, we indicate the name of the LUT file nashville.png saved earlier in the folder with the constructed effect.
"final" : {

 "type" : "FILTER",

 "filter" : {

 "fragmentCode" : "finalColorFilter.fsh",

 "textures" : [{

 "file" : "nashville.png",

 "sampler" : "lookupTexture",

 "magFilter" : "LINEAR",

 "minFilter" : "LINEAR"

 }]

 }

 }
Summing Up
The example of the beauty filter described above can be used as a real-time effect or for photo post-processing in selfie editors. You can see more of Banuba video face beautification and retouch features from the video.
A face beauty filter for live streaming makes the users feel more comfortable about their selfie camera experience, increases engagement with the live stream session, and inspires content creation in users.
You can adjust beautification features and levels creating either the effect of natural beautification with slight use of face modifications or producing Snapchat-like retouch and beauty filters.
-
The official technical documentation for Banuba Face AR SDK is available online and includes requirements, setup instructions, and configuration details:
- Banuba Face AR SDK iOS documentation
- Banuba Face AR SDK Android documentation
- Banuba Face AR SDK Flutter documentation
- Banuba Face AR SDK React Native documentation
- Banuba Face AR SDK Web documentation
- Banuba Face AR SDK Unity documentation
- Banuba Face AR SDK Desktop documentation
This Banuba Face AR SDK documentation should be your primary reference during integration.
-
You can access official integration code samples for the Banuba Face AR SDK on GitHub. Banuba provides platform-specific examples to help you integrate faster:
- Banuba Face AR SDK iOS integration code sample
- Banuba Face AR SDK Android integration code sample
- Banuba Face AR SDK Flutter integration code sample
- Banuba Face AR SDK React Native integration code sample
- Banuba Face AR SDK Desktop integration code sample
- Banuba Face AR SDK Web integration code sample
- Banuba Face AR SDK Unity integration code sample
These Banuba Face AR SDK repositories include setup instructions and minimal working examples for quick deployment.
-
Yes. The Banuba Face AR SDK includes an LLM-friendly documentation file designed for AI-assisted development and internal knowledge systems:
This structured Banuba Face AR SDK text file can be used with AI tools to streamline onboarding and developer workflows.
-
The Banuba Face AR SDK provides official cross-platform plugins to simplify integration into hybrid applications:
These Banuba Face AR SDK plugins are maintained by Banuba and support faster implementation for cross-platform apps.